Abstract
Kontact combines the functionality of a number of KDE applications into a convenient, single interface for personal information management. These applications include KMail for email, KOrganizer for the calendar, KAddressBook for contacts, KNode for newsgroups, and KNotes for notes. Kontact integrates easily with the rest of the KDE desktop and connects to a variety of groupware servers. It includes extra features such as journal entries, Spam and virus filtering, and an RSS reader.
Start Kontact from the main menu. Alternatively, press Alt+F2 and enter kontact . You can also open the individual components instead of the combined application if you only need partial functionality.
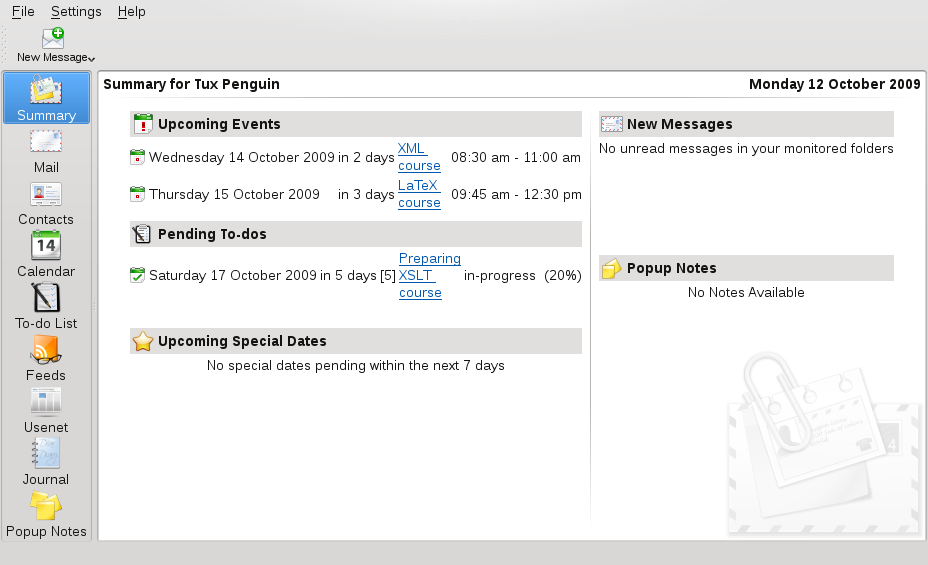
The default window view is shown in Figure 5.1, “The Kontact Summary View”. Use the icons in the left section to access the different components. The provides basic information, including upcoming birthdays, to-dos and the number of new mail messages. The news section can access RSS feeds to provide updated news of interest to you. Use + to configure the information displayed.
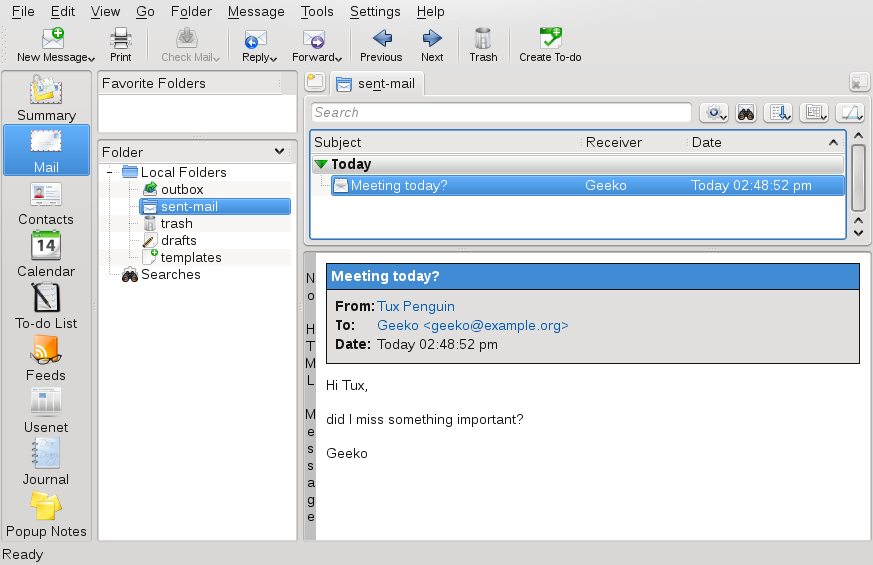
The folder area to the left contains a list of your mail folders (mail boxes) indicating the total number of messages and the number of unread messages. To select a folder, simply click it. The messages in that folder appear in the top right frame. The number of messages in that folder is also shown in the status bar at the bottom of the application window.
The subject, sender, and time of receipt of each message are listed in the header area to the right. Click a message to select it and display it in the message window. Sort the messages by clicking one of the column headers (subject, sender, date, etc.). The contents of the currently selected message are displayed in the message frame of the window. Attachments are depicted as icons at the end of the message, based on the MIME type of the attachment, or they can be displayed inline.
- Contacts
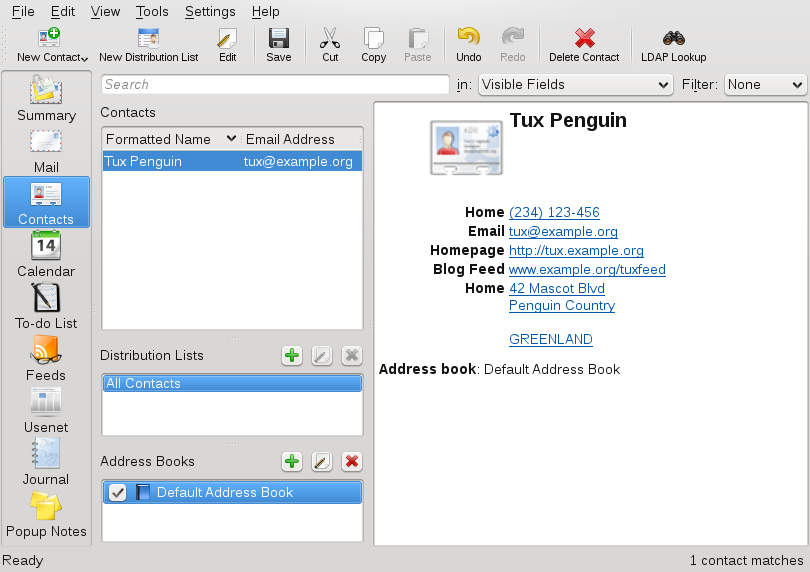
The upper left frame of this component shows all addresses in the currently-activated address books. The lower left frame lists your address books and shows whether they are currently active. The right frame shows the currently-selected contact. Use the search bar at the top to find a particular contact.
- Calendar
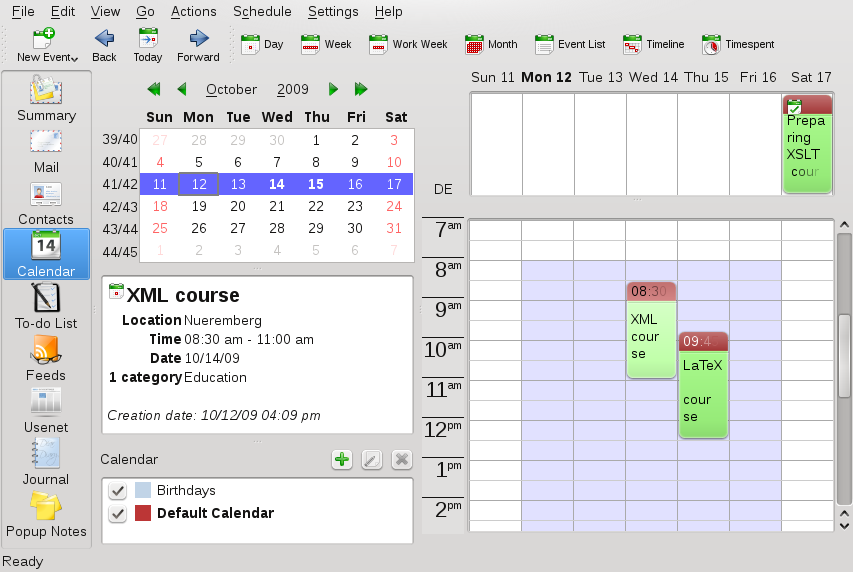
The calendar view is divided into a number of frames. By default, view a small calendar of this month and a week view of the current week. Also find a list of to-dos, a detailed view of the current event or to-do, and a list of calendars with the status of each. Select a different view from the toolbar or the menu.
- To-Do List
shows your list of tasks. Click the field at the top to add a new item to the list. Right-click in the column of an existing item to make changes to the value in that column. An item can be broken into several subitems. Right-click and select to create a subitem. You can also assign to-dos to other people.
- Journal
The provides a place for your reflections, occurrences, or experiences. Choose a date in the calendar frame and click to add a new entry. If a journal entry already exists for the chosen date, edit it in the right frame.
- Notes
Use the Notes component to keep sticky notes to yourself. If you are using KDE, use the KNotes icon in the system tray to make your notes visible on the desktop.
- Feeds
The window is divided into three frames—a tree view with RSS feeds on the left, an article list on the top right, and the article view on the bottom right side. Click a feed in the tree view to display it. Right-click a feed to update, edit, or delete it. Right-click a folder in the tree view to open a menu where you can add a new feed or manipulate existing feeds within.
Kontact uses KMail as its email component. You can also start it separately with the command kmail. To configure it, open the mail component then select +. KMail is a fully-featured email client that supports a number of protocols.
KMail can manage multiple email accounts (private or business). Creating separate identities for your different email accounts allows you to associate different sender addresses, cryptography settings and signatures with each of them. To create an identity, select + and choose +. Determine whether to create a new identity from scratch, use the control center settings , or whether to duplicate an existing identity.
To create a new identity from scratch, enter the name of the new identity and enter your name, organization and email address in the tab. You can also configure one or several of the following options:
Set the keys to use for signing and encrypting messages. For the encryption to work, first create a key with KGpg, as described in Chapter 7, Encryption with KGpg.
Enter a default reply-to and a default blind carbon-copy address, (usually empty), choose a dictionary, select the folders for draft, sent messages, and templates, and define by which sending account the messages should be sent.
Define custom templates to use for new messages, for default replies to senders and lists, and for forwarded messages. To use templates, activate , first.
Click first to use it. Decide how your messages should be signed. Use the input field below to configure your signature or obtain it from a file or the output of a command.
Use this tab to include a picture in the X-Face format in your messages. X-Face can only hold black and white images with a dimension of 48 × 48 pixels. You can obtain the picture from the input field below or from an external source.
Before you can send or receive emails, create one or several accounts. KMail allows both remote accounts and local mailboxes. The settings under determine how Kontact receives and sends email. Many of these settings vary depending on the system and network in which your mail server is located. If you are not sure about the settings or items to select, consult your ISP or system administrator.
To configure a remote account, proceed as follows:
Start Kontact and select ++.
Create an incoming account by clicking on the tab:
Click and choose the account type. Usually it is POP3, IMAP, or disconnected IMAP.
Enter your account name (can be freely choosen), the incoming mail server, login and password.
Decide, if the following options are useful to your setup:
- +
If you use KWallet, check . This makes it a bit more convenient as you do not have to type in your passwords (it is taken once from KWallet, see Chapter Managing Passwords with KWallet Manager (↑KDE User Guide).)
- +
If you need to be up-to-date with your mails, check this option and enter the interval.
- + (POP3 only)
KMail can leave the original message on the server and receive a copy. Especially for POP3 accounts, this could be useful, if you need the mail on a different computer.
- + (IMAP/disconnected IMAP only)
This option lets you choose your identity.
Proceed with .
Create an outgoing account by clicking on the tab and click to choose either or :
If you select SMTP (the default), enter an account name and the host name of the SMTP server. Should the server require login and password, also check and enter the required credentials. Configure additional security settings using the tab.
If you select Sendmail, no further configuration is required.
Apply your settings and leave the account configuration dialog with .
To configure a local mailbox, proceed as follows:
Start Kontact and select ++.
Create an incoming account by clicking on the tab:
Click and choose or .
Enter your account name. Choose any name you like.
Decide which locking method you want. Usually you can leave it on
Proceed with .
Create an outgoing account as described in Step 3.
To compose new messages, select + or click the corresponding icon in the toolbar. To send messages from different email accounts, select one of the identities as described in Section 5.2.1, “Configuring Identities”. Select + to show a popup menu. In , enter an email address or part of a name or address in your address book. If Kontact can match what you enter to something in the address book, a selection list opens. Click the desired contact or complete your input if none matches. To select directly from the address book, click the button next to the field.
To attach files to your message, click the paper clip icon and select the file to attach. Conversely, drag a file from the desktop or another folder to the window or select one of the options in the menu. Normally, the format of a file is recognized correctly. If the format is not recognized, right-click the icon. From the menu that appears, select . Set the format and filename in the next dialog and add a description. In addition, decide whether the attached file should be signed or encrypted.
When you are finished composing your message, send it immediately with
+ or move it to the outbox with +.
If you send the email, the message is copied to
sent-mail after having been sent successfully.
Messages moved to the outbox can be edited or
deleted.
Message folders help organize your messages. By default, they are
located in the ~/.kde4/share/apps/kmail/mail
directory. When starting KMail for the first time, the program creates
several folders. If you are using IMAP, the IMAP folders are listed
below the local folders. Each incoming mail server has its folders in
the Folder list.
If you want to organize your messages in additional folders, select from your list your parent folder and create new folders by selecting +. This opens a window in which to specify the name and format of the new folder.
Right-click the folder for a context menu offering several folder operations. Click to specify the expiration date for read and unread messages, what should happen with them after expiration, and whether expired messages should be deleted or moved to a folder. If you intend to use the folder to store messages from a mailing list, set the necessary options under +.
To move one or several messages from one folder to another, drag them from the upper window and drop them into the appropriate folder in the left window. Messages can also be moved by highlighting the messages then pressing M or selecting +. In the list of folders that appears, select the folder to which to move your messages.
Additionally, you can add folders to the pane. This enables you to go quickly to your frequently used mail folders, especially if your folders are deeply structured. Choose the relevant folder and select .
Email is an insecure medium, as anyone could theoretically read your emails or send some in your name. By signing your emails you enable the recipient of your emails to verify the sender of the messages as the key used to sign is only available to you. By encrypting the contents of your emails you ensure that they can only be read by the recipient. KMail supports both the signing and encryption of emails.
Prepare KMail for signing and encrypting emails:
Generate a key pair as described in Section 7.2, “Generating a New Key Pair” and export your public key as described in Section 7.3, “Exporting the Public Key”.
Configure the details of the encryption procedure in KMail:
Start KMail and go to ++.
Select the identity under which to send encrypted and signed messages. Click and proceed to .
Change the by clicking on and selecting your key from the dialog box.
Change the by clicking on and selecting your key from the dialog box.
Change to + and check . With this option you can decrypt the message or file at any time.
Apply your settings and leave the configuration dialog with .
Sign your emails to allow the recipient to verify whether these have really been sent by you. KMail uses your private key to sign your messages and the recipient can verify the signature using your public key available on key servers. To sign an email, proceed as follows:
Compose your email as usual.
Select +.
If you know the recipient can download your public key from a key server, you can omit this step. For convenience reasons, select + to create an attachment to your email containing your public key.
Send your message as usual via + and enter your key's passphrase when prompted. KMail signs your message using your private key and the recipient can verify the signature by the public key attached to your message.
Use encryption on your emails whenever you want to make sure that only the recipient can read the contents. To be able to exchange encrypted emails with another party, get the appropriate public key and use it to encrypt your message. At the other end, the private key is then used to decrypt the contents of your message. Of course, you can use both signatures and encryption on your messages.
To send an encrypted email, proceed as follows:
Start KGpg with Alt+F2 and entering kgpg.
Get the recipient's public key:
If you get it directly from the recipient, import the key with KGpg via +.
Access a public key server and import it from there. Select in KGpg +, and search for the key. Select the respective key and import it into your keyring.
Compose a new message in KMail.
Select +. In the mail window a blue line is displayed.
Send the mail. A dialog window opens and asks you for the correct key.
Check whether all keys are correct.
Enter your passphrase.
To import email from other applications, select + from the mail view in Kontact. It currently features import filters for Outlook Express, the mbox format, email text format, Pegasus Mail, Opera, Evolution, and more. The import utility can also be started separately with the command kmailcvt.
Select the corresponding application and confirm with . A file or a folder must be provided, depending on the selected type. KMail then completes the process.
Filters are a convenient method of automatically processing incoming mail. They use aspects of the mail such as sender or size, to move mail to certain folders, delete unwanted mails, bounce mails back to the sender, or perform a number of other actions.
To create a filter based on an existing message, right-click the desired message then select and the desired filter criteria. To create a filter from scratch, select +.
Select the match method for filter criteria (all or any). Then select criteria that applies only to the desired messages. In , set what the filter should do to the messages that meet the criteria. The tab provides control over whether the filter is applied for specific accounts only.
Filters are applied in the order listed in the dialog accessed with +. Change the order by selecting a filter and clicking the arrow buttons. Filters are only applied to new incoming messages or sent messages as specified in the filter's advanced options. To apply filters to existing messages, right-click the desired messages and choose + and the desired filter.
If your filters do not act as expected, monitor them with +. When logging is enabled in this dialog, it shows how messages are processed by your filters and can help locate the problem.
The contacts component uses KAddressBook. You can also start it separately with the command kaddressbook. Configure it with +. To search for a particular contact, use the search bar. With , select to display only contacts in a certain category. Right-click a contact to open a menu in which to select from a variety of options, such as sending the contact information in an email.
To add a contact with the name and email address from an email, right-click the address in the mail component and select . To add a new contact without using an email, select + in the address component. Both methods open a dialog in which to enter information about the contact.
In the tab, enter basic contact information, such as name, email addresses, and telephone numbers. Categories can be used to sort addresses. contains more specific information, such as birthday and spouse's name.
If your contact uses an instant messenger, you can add these identities in . If you do this and have Kopete or another KDE chat program running at the same time as Kontact, view status information about these identities in Kontact. In , enter the contact's encryption data, such as public key.
has additional information, such as a photograph and the location of the user's Free/Busy information. Use to add your own information to the contact or address book.
Contacts can also be imported in a variety of formats. Use + and select the desired format. Then select the file to import.
If you frequently send email messages to the same group of people, a distribution list enables you to store multiple email addresses as a single contact item so that you do not need to enter each name individually in every email you send to that group. To create a distribution list, proceed as follows:
Click ++. A new section appears.
Click .
Enter a name for the list and click .
Add contacts to the list by dragging them from the address list and dropping them in the distribution list window.
Use this list like you would an individual contact when creating an email.
![[Important]](admon/important.png)
Kontact can access multiple address books, such as shared ones offered by Novell GroupWise or an LDAP server. Select + to view the current address books. Press to add one then select the type and enter the required information.
The check boxes in front of the address books show the activation status of each address book. To prevent the display of a book without deleting it, uncheck it. deletes the selected book from the list.
Kontact uses KOrganizer as its calendar component. You can also start it separately with the command korganizer. To configure it, use +. With the calendar, enter appointments and schedule meetings with others. If desired, you can be reminded of upcoming events. You can also import, export, and archive calendars with the options from the menu.
Add a new event or meeting with +. Enter the desired details. Under , specify the exact time (minutes, hours, or days in advance) that the attendees should be reminded of the event. If an event recurs, specify the appropriate interval. Another way to create an event at a specific point in the calendar is to double-click the corresponding field in one of the program's calendar views. This opens the same dialog window as that available from the menu. Alternatively, select a time range in the Calendar view and right-click.
Specify the attendees of an event by entering their data manually in the dialog or by inserting data from the address book. To enter data manually, select . To import data from the address book, click then select the corresponding entries from the dialog. To schedule the event based on the participants' availability, go to and click .
Use the tab to configure an event that happens on a regular basis. can be convenient for linking other information with the event, such as an agenda for a meeting.
The calendar module can connect to multiple calendars simultaneously. This is useful for combining a personal calendar with an organizational one. To add a new calendar, click then select the calendar type. Complete the necessary fields.
The check boxes in front of the calendars show the activation status of each. To prevent the display of a calendar without deleting it, uncheck it. deletes the selected calendar from the list.
Kontact includes help for itself and its various components. Access it with +. The project's Web page, http://www.kontact.org, is also informative.