Contents
Tomboy is a GNOME note-taking application that enables you to organize the ideas and information you deal with every day. Among other things, it can help you collect and sort all kind of data, write down your ideas, allocate your contacts and make to-do lists.
Tomboy also has some useful editing features to help you customize your notes, including:
Highlighting search text
Inline spell checking
Auto-linking Web and email addresses
Undo/redo support
Font styling and sizing
Bulleted lists
Tomboy is located on the GNOME panel, and by default is started
automatically when you log into GNOME. You can also access Tomboy by
clicking +++. ![]()
To create a new note, click the Tomboy Notes icon in your GNOME Panel,
then select . ![]()
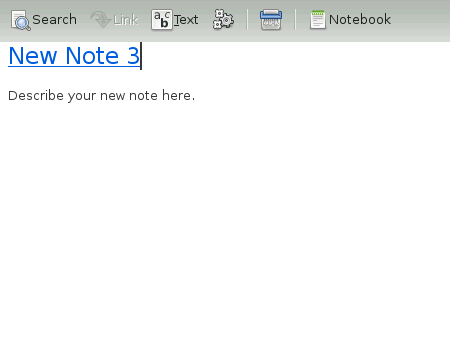
To edit the note, click the content area, then use the keyboard to add
and remove content. The first line of the note contains its title. By
default, this is populated with the text New Note
. You can change the title by
clicking the line and using the keyboard. By default, focus is given to
the content area upon creation of a new note, so you can immediately
start editing the note without clicking the content area. For more
information on formatting the contents of a note, see
Section 9.5, “Formatting Text in Notes”.
#
Your note is saved automatically.
You can then organize the notes you create by linking related notes and ideas together. Fore more information, see Section 9.3, “Linking Notes”.
To get an overview of all your notes, click and then select
. By default, the Search All Notes
dialog box displays your notes in the order they were last modified.
Click the or
column headings to change the sort order. Click the column heading a
second time to toggle between ascending and descending order.
![]()
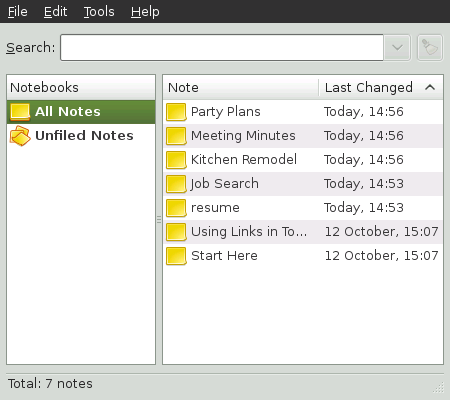
You can find specific notes by entering text into the field. The list of notes automatically updates to list only the notes that contain matching text.
To open a note listed in the Search All Notes dialog box, do any of the following:
Double-click a note.
Select a note, then click +.
Right-click a note, then select .
Select a note, then press Ctrl+O.
You can link notes in Tomboy by highlighting text in your current note, then clicking the button in the toolbar. This creates a new note and underlines the note's title in the current note.
For example, if your current note contains the phrase “resume,” you can select this text, then click to create a new note with the title “resume.” A link is also created in the current note which you can click to open the new “resume” note.
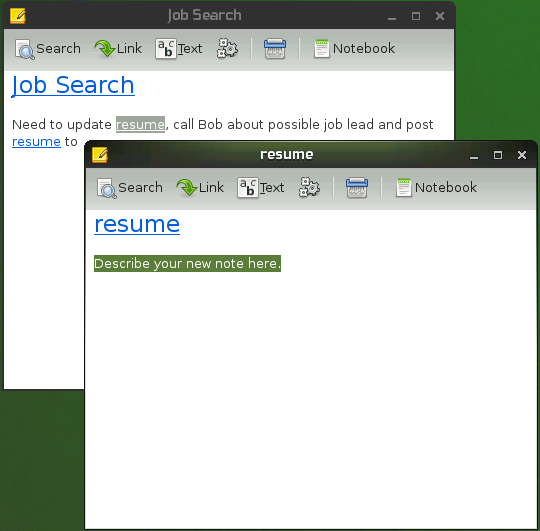
If you change the title of a note, the links in other notes to that note are automatically updated. Typing the name of another note in your current note automatically links that note for you. To see what other notes link to the current note, click +
To access your notes, click the Tomboy icon on the GNOME panel, then
select one of the notes you recently viewed or created from the menu, or
search for older notes (see
Section 9.2, “Searching All Notes”
for more information). ![]()
To force a note to always appear in the panel menu regardless of when you
last accessed it, click the thumbtack icon to the right of the note to
“pin” it to the menu. Notes that are pinned to the panel
menu have a thumbtack icon that look like this:  . Notes that are not pinned to the panel menu have
thumbtack icons that look like this:
. Notes that are not pinned to the panel menu have
thumbtack icons that look like this:  .
.
You can use the button on the Tomboy toolbar to format text within your notes. The button displays a drop-down menu with the following options:
- Undo
Allows you to revert previous changes made to your note during the current session. To undo your last change using the keyboard, press Ctrl+Z.
- Redo
Allows you to put back changes that were removed using the feature. To redo your last change using the keyboard, press Shift+Ctrl+Z.
- Bold
To make text within your note bold, select the text you want to modify, then select the option from the drop-down menu. You can also press Ctrl+B after selecting text.
- Italic
To make text within your note italic, select the text you want to modify, then select the option from the drop-down menu. You can also press Ctrl+I after selecting text.
- Strikeout
Puts a line through the selected text. To add a strikeout, select the text you want, then select the option from the drop-down menu. You can also press Ctrl+S after selecting text.
- Highlight
Puts a yellow background around the selected text. To add a highlight, select the text you want, then select the option from the drop-down menu. You can also press Ctrl+H after selecting text.
- Fixed Width
The fixed width style allows text to use a fixed width font. To change existing text, select the text you want to modify, then select the option from the drop-down menu. You can also select the option from the drop-down menu before you start typing to have the text you type be in a fixed width style.
- Font Size
There are four options in this part of the menu: , , , and . Each of these options represents a font size you can use for the selected text in the note. To modify the font size, select the text you want to modify, then select one of the options from the drop-down menu.
- Bullets
Select the option from the drop-down menu in order to begin or end a bulleted list. If your cursor is inside a bulleted list, the and options are enabled.
For more information on bullets, see Section 9.5.1, “Using Bulleted Lists”.
- Increase Indent
With the cursor on a bulleted list line, select this option to shift the current line to the right.
- Decrease Indent
With the cursor on a bulleted list line, select this option to shift the current line to the left.
- Find in This Note
Lets you search for text within the current note. Selecting this option causes a bar to open at the bottom of the note. To open the bar using the keyboard, press Ctrl+F.
Enter the text you want to find. After entering text, all matches are highlighted. Click to highlight the next match and place the cursor there. Click to move to the previous match.
To close the find bar, click on the far left or press the Escape key.
Tomboy's bulleted lists are useful for creating hierarchically-structured content. Creation and formatting of bulleted lists is described in this section.
To begin a bulleted list, use any of the following methods:
Select from the drop-down menu.
Write a line of text immediatelly after the automatically created bullet, then press Enter.
To end a bulleted list, do any of the following:
Select from the drop-down menu.
Press Enter on a blank bulleted line.
Select from the drop-down menu until the current line is no longer part of the bulleted list.
Press Shift+Tab until the current line is no longer part of the bulleted list.
To increase the line indentation in a bulleted list, select from the drop-down menu, or press the Tab key.
You can create an HTML (Hypertext Markup Language) document from one or more notes.
In the note you want to export, select the option from the drop-down menu.
Specify where to save the HTML file.
If you want to export any notes for which a link exists in the current note, select . To export all notes for which a link exists in any of the notes, select .
Click .
To delete a note, click the button on the Tomboy toolbar. You will see a dialog box asking if you want to permanently delete the note and its contents. Click to discard the note permanently, or click to abort the process.
Links to this note from other notes will still exist, but will re-create the note upon activation.
Select the option on the drop-down menu to print the current note. You will be presented with the standard GNOME print dialog box.
To modify preferences for Tomboy, right-click the Tomboy icon
(![]() ) on the GNOME panel, then select
. You can set preferences related to
, ,
and on
relevant tabs.
) on the GNOME panel, then select
. You can set preferences related to
, ,
and on
relevant tabs.
The tab of the dialog lets you set options related to editing of notes.
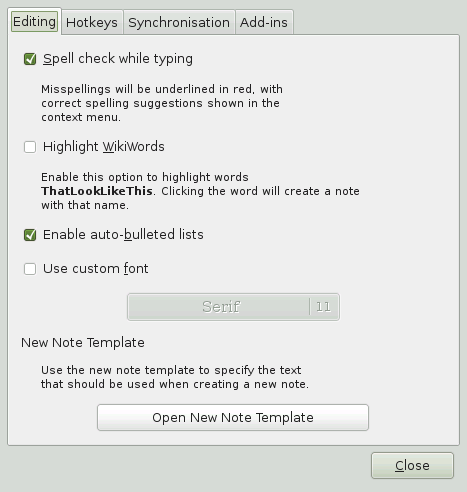
The Editing preferences include the following:
- Spell check while typing
Underlines misspellings in red, and provides suggestions in the right-click context menu.
- Highlight WikiWords
Creates links for phrases
ThatLookLikeThis. Clicking the link creates a new note with the title corresponding to the link text.- Use custom font
Sets a custom font to be used in your notes. If this option is disabled, the default system font will be used.
- New note template
Sets the default text that is used for any newly-created note.
The tab of the dialog lets you set global key combinations to perform different functions in Tomboy. To set key combinations, the checkbox must be selected. Press Alt+H to toggle this option on or off.
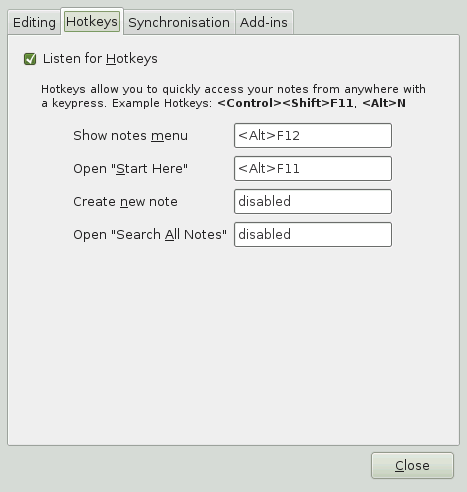
The Hotkey preferences include the following:
- Show notes menu
Specify the key combination to open the notes menu.
- Open “Start Here”
Specify the key combination to open the “Start Here” note, which is pre-installed with Tomboy.
- Create new note
Specify the key combination to create a new note.
- Open “Search All Notes”:
Specify the key combination to open the dialog box.
The tab of the dialog lets you share notes, announce notes, receive announcements, and get notes from other instances of Tomboy. This can be useful, for example, if you want to work on a single set of notes in separate instances of Tomboy running on your desktop and your laptop.
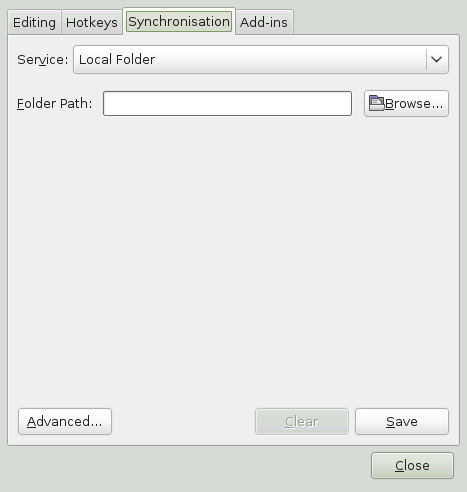
The Synchronization preferences include the following:
- Service
Specify the location of the synchronized files. By default, you can select a local folder or WebDAV server. To synchronize to a remote location, click the tab, select +, then click . This adds an option to the drop-down list.
Specify the information required for the Service you selected, then click .
- Advanced
Specify what happens when a conflict is detected between a local note and a note on the configured synchronization server. You can choose to be prompted when a conflict occurs, to rename the local note, or to replace the local note with the note on the synchronization server.
- Clear
Clears your current synchronization settings. If you choose to clear your synchronization settings, you might have to synchronize your notes again when you save new settings.
To synchronize your notes, click + in any open note.
The Add-ins tabbed page lets you enable and configure Tomboy add-ins (formerly called plugins). Tomboy comes with several pre-installed add-ins, such as Backlinks, Bugzilla Links, Evolution Mail Integration, Export to HTML, Fixed Width, Note of the Day, Printing Support, and Sticky Notes Importer.
The list of installed add-ins is shown on the left of the Add-ins tabbed page. To enable or disable an add-in, select the plugin you want, then click or .
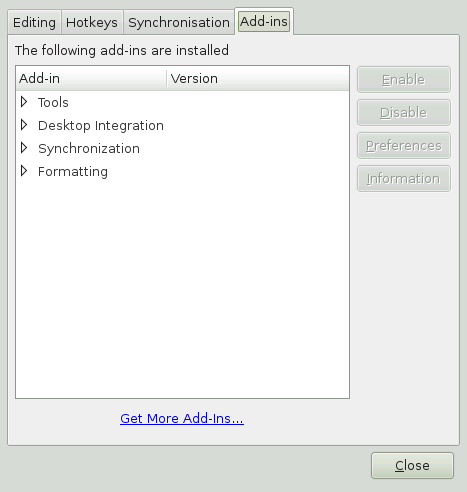
Additional add-ins can be found in the
Tomboy
Add-ins page. Place new add-ins in the
$HOME/.tomboy/addins folder.