| openSUSE-Dokumentation Novell AppArmor Administration Guide / Kapitel 3. Building and Managing Profiles with YaST | ||||
|---|---|---|---|---|
 | 2.6. Important Filenames and Directories | 3.2. Manually Adding a Profile |  | |
| openSUSE-Dokumentation Novell AppArmor Administration Guide / Kapitel 3. Building and Managing Profiles with YaST | ||||
|---|---|---|---|---|
| 2.6. Important Filenames and Directories | 3.2. Manually Adding a Profile | | |
Inhaltsverzeichnis
YaST is an easy way to build profiles and manage Novell® AppArmor. It provides two interfaces: a fully graphical one and a text-based one. The text-based interface consumes less resources and bandwidth, making it a better choice for remote administration or for times when a local graphical environment is inconvenient. Although the interfaces have differing appearances, they offer the same functionality in similar ways. Another alternative is to use AppArmor commands, which can control AppArmor from a terminal window or through remote connections. The command line tools are described in Kapitel 4, Building Profiles from the Command Line.
Start YaST from the main menu and enter your root
password when prompted for it. Alternatively, start YaST by opening a
terminal window, logging in as root, and entering
yast2 for the graphical mode or yast
for the text-based mode.
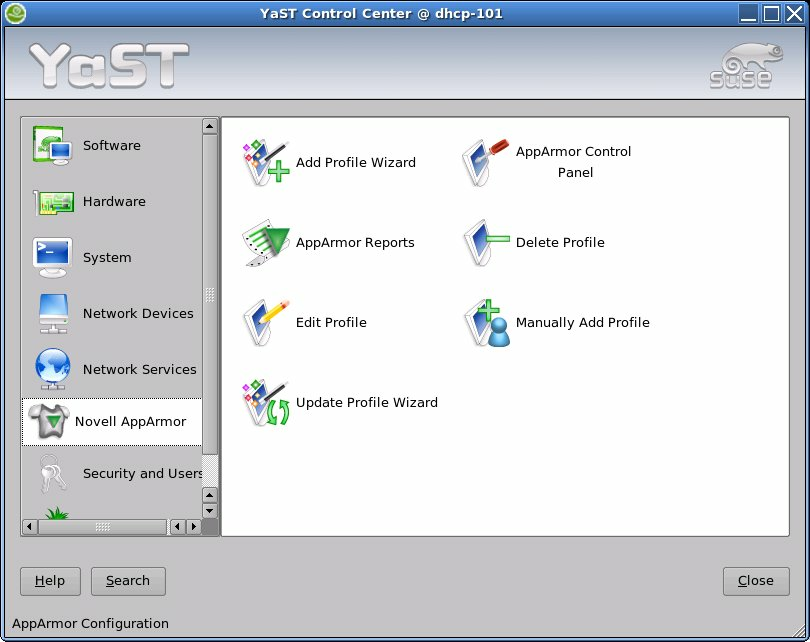
The right frame shows the AppArmor options:
For detailed steps, refer to Abschnitt 3.1, „Adding a Profile Using the Wizard“.
Add a Novell AppArmor profile for an application on your system without the help of the wizard. For detailed steps, refer to Abschnitt 3.2, „Manually Adding a Profile“.
Edits an existing Novell AppArmor profile on your system. For detailed steps, refer to Abschnitt 3.3, „Editing Profiles“.
Deletes an existing Novell AppArmor profile from your system. For detailed steps, refer to Abschnitt 3.4, „Deleting a Profile“.
For detailed steps, refer to Abschnitt 3.5, „Updating Profiles from Log Entries“.
For detailed steps, refer to Abschnitt 6.3, „Configuring Reports“.
For detailed steps, refer to Abschnitt 3.6, „Managing Novell AppArmor and Security Event Status“.
is designed to set up Novell AppArmor profiles using the AppArmor profiling tools, aa-genprof (generate profile) and aa-logprof (update profiles from learning mode log file). For more information about these tools, refer to Abschnitt 4.6.3, „Summary of Profiling Tools“.
Stop the application before profiling it to ensure that application start-up is included in the profile. To do this, make sure that the application or daemon is not running.
For example, enter
/etc/init.d/PROGRAM stop
in a terminal window while logged in as root, replacing
PROGRAM with the name of the program to
profile.
Start YaST and select +.

Enter the name of the application or browse to the location of the program.
Click . This runs an AppArmor tool named aa-autodep, which performs a static analysis of the program to profile and loads an approximate profile into the AppArmor module. For more information about aa-autodep, refer to Abschnitt 4.6.3.1, „aa-autodep—Creating Approximate Profiles“.
Run the application to profile.
Perform as many of the application functions as possible so learning mode can log the files and directories to which the program requires access to function properly. Be sure to include restarting and stopping the program in the exercised functions. AppArmor needs to handle these events as well as any other program function.
Click to parse the learning mode log files. This generates a series of questions that you must answer to guide the wizard in generating the security profile.
If requests to add hats appear, proceed to Kapitel 5, Profiling Your Web Applications Using ChangeHat.
The questions fall into two categories:
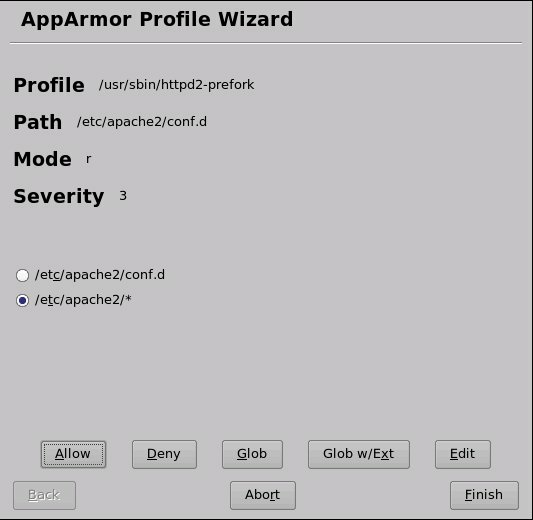
A resource is requested by a profiled program that is not in the profile (see Abbildung 3.2, „Learning Mode Exception: Controlling Access to Specific Resources“). Allow or deny access to a specific resource.
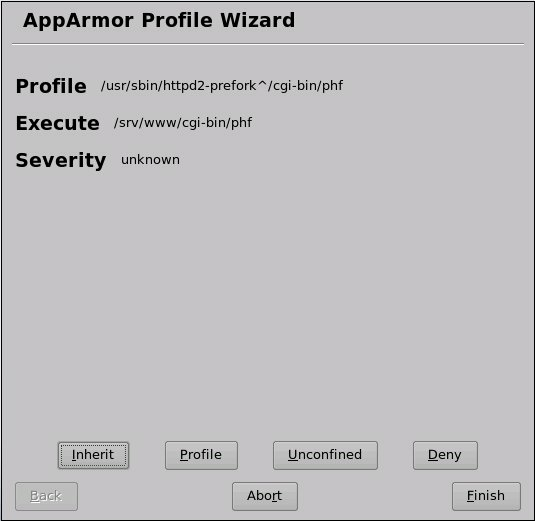
A program is executed by the profiled program and the security domain transition has not been defined (see Abbildung 3.3, „Learning Mode Exception: Defining Execute Permissions for an Entry“). Define execute permissions for an entry.
Each of these cases results in a series of questions that you must answer to add the resource to the profile or to add the program to the profile. For an example of each case, see Abbildung 3.2, „Learning Mode Exception: Controlling Access to Specific Resources“ and Abbildung 3.3, „Learning Mode Exception: Defining Execute Permissions for an Entry“. Subsequent steps describe your options in answering these questions.
![[Note]](admon/note.png) | Varying Processing Options |
|---|---|
Depending on the type of entry processed, the available options vary. | |
The begins suggesting directory path entries that have been accessed by the application profiled (as seen in Abbildung 3.2, „Learning Mode Exception: Controlling Access to Specific Resources“) or requires you to define execute permissions for entries (as seen in Abbildung 3.3, „Learning Mode Exception: Defining Execute Permissions for an Entry“).
For Abbildung 3.2: Learning Mode Exception: Controlling Access to Specific Resources: Select the option that satisfies the request for access, which could be a suggested include, a particular globbed version of the path, or the actual pathname. Depending on the situation, these options are available:
#includeThe section of a Novell AppArmor profile that refers to an include file. Include files give access permissions for programs. By using an include, you can give the program access to directory paths or files that are also required by other programs. Using includes can reduce the size of a profile. It is good practice to select includes when suggested.
Accessed by clicking . For information about globbing syntax, refer to Abschnitt 2.1.2, „Paths and Globbing“.
Literal path that the program needs to access to run properly.
After selecting a directory path, process it as an entry to the Novell AppArmor profile by clicking or . If you are not satisfied with the directory path entry as it is displayed, you can also or it.
The following options are available to process the learning mode entries and build the profile:
Grant the program access to the specified directory path entries. The suggests file permission access. For more information about this, refer to Abschnitt 2.1.3, „File Permission Access Modes“.
Click to prevent the program from accessing the specified paths.
Clicking this modifies the directory path (using wild cards) to include all files in the suggested directory. Double-clicking it grants access to all files and subdirectories beneath the one shown. For more information about globbing syntax, refer to Abschnitt 2.1.2, „Paths and Globbing“.
Modify the original directory path while retaining the filename
extension. A single click causes
/etc/apache2/file.ext to become
/etc/apache2/*.ext, adding the wild card
(asterisk) in place of the filename. This allows the program to
access all files in the suggested directories that end with the
.ext extension. When you double-click it, access
is granted to all files with the particular extension and
subdirectories beneath the one shown.
Edit the highlighted line. The new edited line appears at the bottom of the list.
Abort aa-logprof, losing all rule changes entered so far and leaving all profiles unmodified.
Close aa-logprof, saving all rule changes entered so far and modifying all profiles.
Click or for each learning mode entry. These help build the Novell AppArmor profile.
| Anmerkung |
|---|---|
The number of learning mode entries corresponds to the complexity of the application. | |
For Abbildung 3.3: Learning Mode Exception: Defining Execute Permissions for an Entry: From the following options, select the one that satisfies the request for access. For detailed information about the options available, refer to Abschnitt 2.1.3, „File Permission Access Modes“.
Stay in the same security profile (parent's profile).
Require a separate profile to exist for the executed program. When selecting this option, also select whether AppArmor should sanitize the environment when switching profiles by removing certain environment variables that can modify the execution behavior of the child process. Unless these variables are absolutely required to properly execute the child process, always choose the more secure, sanitized option.
Execute the program without a security profile. When prompted, have AppArmor sanitize the environment to avoid adding security risks by inheriting certain environment variables from the parent process.
![[Warning]](admon/warning.png) | Risks of Running Unconfined |
|---|---|
Unless absolutely necessary, do not run unconfined. Choosing the option executes the new program without any protection from AppArmor. | |
Click to prevent the program from accessing the specified paths.
Abort aa-logprof, losing all rule changes entered so far and leaving all profiles unmodified.
Close aa-logprof, saving all rule changes entered so far and modifying all profiles.
Repeat the previous steps if you need to execute more functionality of the application.
When you are done, click . In the following pop-up, click to exit the . The profile is saved and loaded into the AppArmor module.