| openSUSE-Dokumentation Kapitel 1. Getting Started with the KDE Desktop / 1.8. Printing | ||||
|---|---|---|---|---|
 | 1.7. Moving Text between Applications | 1.9. Managing Internet Connections |  | |
| openSUSE-Dokumentation Kapitel 1. Getting Started with the KDE Desktop / 1.8. Printing | ||||
|---|---|---|---|---|
| 1.7. Moving Text between Applications | 1.9. Managing Internet Connections | | |
After having configured one or more printers with YaST as described in Abschnitt „Einrichten eines Druckers“ (Kapitel 2, Einrichten von Hardware-Komponenten mit YaST, ↑Start), you can address them from any application.
In KDE, you usually start print jobs with KPrinter. This application is started automatically each time you print from a KDE application. In the KPrinter dialog, choose a printer and edit the of your print job, such as page orientation, pages per sheet, and duplex printing.
![[Tip]](admon/tip.png) | Sending Files to a Printer without Opening the Application |
|---|---|
You can also start KPrinter manually by pressing Alt-F2 and entering kprinter. This is useful if you want to print one or several files without starting the application to view or edit the file. The KPrinter dialog then additionally includes the tab, where you can determine the files to print. Either drag them from the desktop and drop them into the list or use the file dialog to locate them. | |
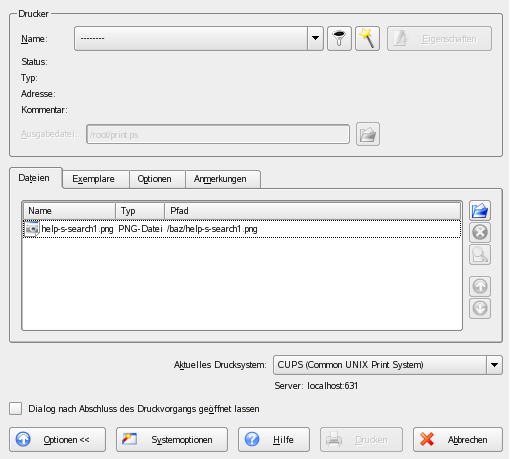
To specify the number of copies and various other options, click at the bottom left. The window then expands and shows three tabs: , , and . See Abbildung 1.15, „Starting a Print Job with KPrinter“.
The tab determines the page selection (all pages of the selected document, the currently selected one, or a range) and the number of copies. You may also choose to print only the even or only the odd numbered pages of the selected document. Use to specify any additional information for the print job. Enter any if needed or set a custom page label at the top and bottom of the page. The can also be set here. The last tab, is rarely needed. Once your print job has been filed, you can watch its progress using KJobViewer.
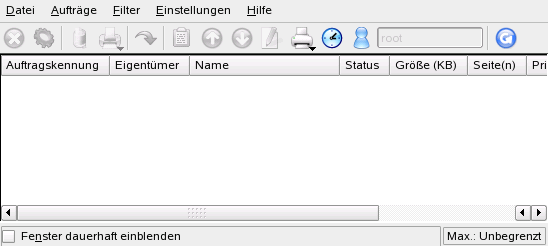
Start KJobViewer from the main menu or with kjobviewer from the command line. A window like that in Abbildung 1.16, „Monitoring Print Jobs with KJobViewer“ opens, listing all the print jobs queued on your printer. As long as your print job is not active, you can edit it. Do this using the entries of the menu.
If, for example, you want to check if you sent the correct document to the printer, you can stop the job and resume it if you decide to print it. Remove your own print jobs from the queue with . To change the printer, select a different printer with .
With , reprint a document. To do this, select +, select the desired document, and click +. Clicking + shows the technical details of a job. Use + and + to set the priority, depending on how quickly you need the document.
enables you to switch between various printers, toggle completed jobs, and limit the view to your own print jobs by selecting . The current user is then displayed in the top right field.
+ opens a configuration dialog. Here, determine the maximum number of print jobs to display. Enter a number in the field or use the slider to the right to determine a value. Press to save the setting or to exit the dialog without saving.
The icons in the toolbar correspond to the functions you can access by way of the menu. Display a help text explaining the function by holding the mouse pointer over one of the icons.
The job list consists of eight columns. The job ID is automatically assigned by the print system to identify the various jobs. The next column contains the login of the user who sent the job followed by the filename of the document. The status column indicates whether a job is still in the queue, currently being printed, or already completed. Next, the size of the document is displayed in kilobytes and number of pages. The default priority of 50 can be increased or reduced if necessary. Billing information can be cost centers or other company-specific information. If you right-click a job in the list, the menu opens under the mouse pointer, allowing you to select an action. Only a few functions are available for completed jobs. If you activate , KJobViewer opens automatically the next time you log in.