Contents
OpenOffice.org Writer is a full-featured word processor with page and text formatting capabilities. Its interface is similar to interfaces of other major word processors, and it includes some features that are usually found only in expensive desktop publishing applications.
This chapter highlights a few key features of Writer. For more information about these features and for complete instructions for using Writer, look at the OpenOffice.org help or at the sources listed in Section 1.10, “For More Information”.
Much of the information in this chapter can also be applied to other OpenOffice.org modules. For example, other modules use styles similarly to how they are used in Writer.
Find some major enhancements listed below.
- Displaying Multiple Pages in Editing Mode
OpenOffice.org now includes a set of icons at the right corner of the status bar that allows you to display multiple pages in the editing mode. With the slide bar, zoom seamlessly in and out of the document. When zooming out, OpenOffice.org displays more pages of your document.
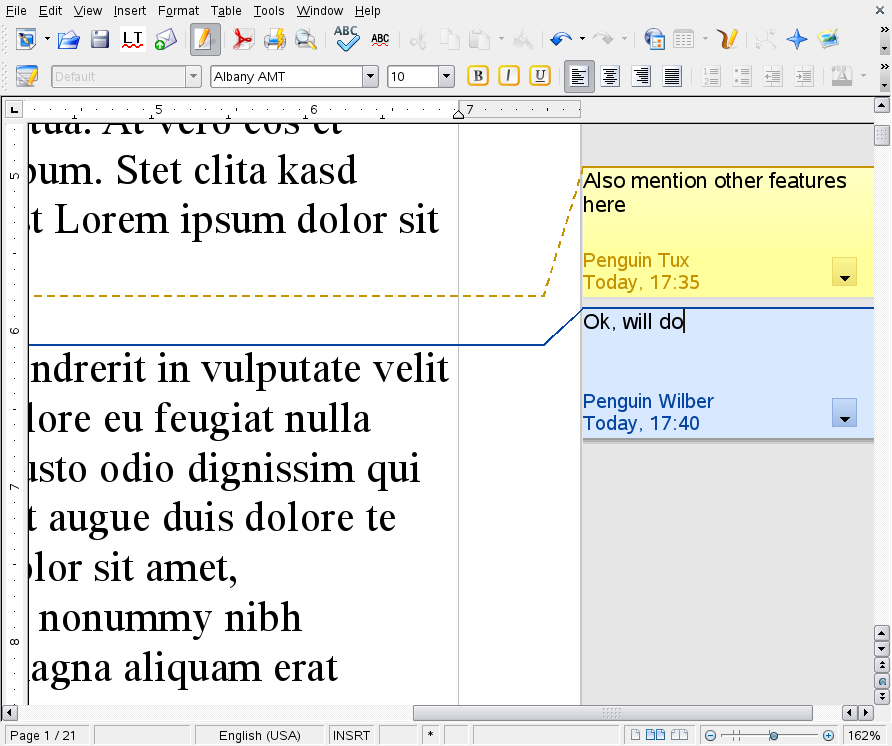
- Display and Usability of Notes
When editing or reviewing a document, users can add notes to the text. In contrast to earlier versions of OpenOffice.org where notes were only shown as small rectangles within the text, the notes are now displayed on the side of the document. Notes from different users are displayed in different colors and also show editing date and time.
The Novell edition of OpenOffice.org includes additional features available also in Writer, like enhanced fonts, support of certain file formats or GroupWise integration. For more details, refer to Section 1.3, “Novell Edition of OpenOffice.org”.
There are two ways to create a new document.
To create a document from scratch, click ++.
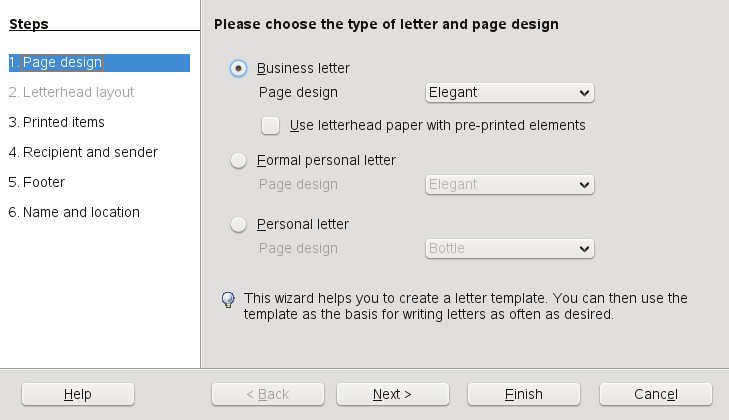
To use a standard format and predefined elements for your own documents, try a wizard. For example, to create a business letter, click ++. Using the wizard's dialogs, easily create a basic document using a standard format. A sample wizard dialog is shown in Figure 2.1.
Enter text in the document window as desired. Use the toolbar or the menu to adjust the appearance of the document. Use the menu or the relevant buttons in the toolbar to print and save your document. With the options under , add extra items to your document, such as a table, picture, or chart.
You can use Writer to edit documents created in a variety of other word processors. For example, you can import a Microsoft Word document, edit it, and save it again as a Word document. Most Word documents can be imported into OpenOffice.org without any problem. Formatting, fonts, and all other aspects of the document remain intact. However, some very complex documents (such as documents containing complicated tables, Word macros, or unusual fonts or formatting) might require some editing after being imported. OpenOffice.org can also save in many popular word processing formats. Likewise, documents created in OpenOffice.org and saved as Word files can be opened in Microsoft Word.
This means if you use OpenOffice.org in an environment where you frequently share documents with Word users, you should have little or no trouble exchanging document files. Just open the files, edit them, and save them as Word files.
OpenOffice.org uses styles for applying consistent formatting to various elements in a document. The following types of styles are available via the menu:
Table 2.1. About the Types of Styles
|
Type of Style |
What it Does |
|---|---|
|
|
Applies standardized formatting to the various types of paragraphs in your document. For example, apply a paragraph style to a first-level heading to set the font and font size, spacing above and below the heading, location of the heading, and other formatting specifications. |
|
|
Applies standardized formatting for types of text. For example, if you want emphasized text to appear in italics, you can create an emphasis style that italicizes selected text when you apply the style to it. |
|
|
Applies standardized formatting to frames. For example, if your document uses sidebars, you can create frames with specified graphics, borders, location, and other formatting so that all of your sidebars have a consistent appearance. |
|
|
Applies standardized formatting to a specified type of page. For example, if every page of your document contains a header and footer except for the first page, you can use a first page style that disables headers and footers. You can also use different page styles for left and right pages so that you have bigger margins on the insides of pages and your page numbers appear on an outside corner. |
|
|
Applies standardized formatting to specified list types. For example, you can define a checklist with square check boxes and a bullet list with round bullets, then easily apply the correct style when creating your lists. |
The window (called the in earlier versions of OpenOffice.org) is a versatile formatting tool for applying styles to text, paragraphs, pages, frames, and lists. To open this window, click +.
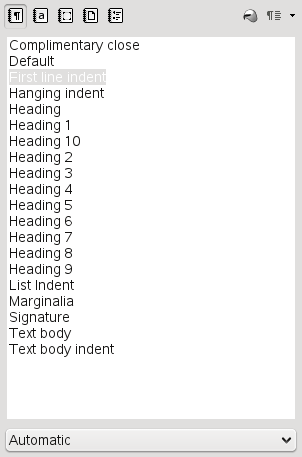
OpenOffice.org comes with several predefined styles. You can use these styles as they are, modify them, or create new styles. Use the icons at the top of the window to display formatting styles for the most common elements like paragraphs, frames, pages or lists. Go on with the instructions below, to get to know more about styles.
To apply a style, select the element you want to apply the style to, and then double-click the style in the window. For example, to apply a style to a paragraph, place the cursor anywhere in that paragraph and double-click the desired paragraph style.
![[Tip]](admon/tip.png) | Docking the Style and Formatting Window |
|---|---|
By default, the window is a
floating window; that is, it opens in its own window that you can place
anywhere on the screen. To make it appear always in the same part of
the Writer interface, you can The docking/undocking mechanism applies to some other windows in OpenOffice.org as well, including the Navigator. | |
With styles, you can change formatting throughout a document by changing a style, rather than applying the change separately everywhere you want to apply the new formatting.
In the window, right-click the style you want to change.
Click .
Change the settings for the selected style.
For information about the available settings, refer to the OpenOffice.org online help.
Click .
OpenOffice.org comes with a collection of styles to suit many users’ needs. However, most users eventually need a style that does not yet exist. To create a new style:
Right-click in any empty space in the window.
Make sure you are in the list of styles for the type of style you want to create. For example, if you are creating a character style, make sure you are in the character style list.
Click .
Click .
Name your style and choose the settings you want applied with that style.
For details about the style options available in any tab, click that tab and then click .
Using styles, rather than the menu options and buttons, helps to give your pages, paragraphs, texts, and lists a more consistent look and makes it easier to change your formatting. For example, if you emphasize text by selecting it and clicking the button, then later decide you want emphasized text to be italicized, you need to find all of your bolded text and manually change it to italics. If you use a character style, you only need to change the style from bold to italics and all text that has been formatted with that style automatically changes from bold to italics.
Text that is formatted with a menu option or button overrides any styles you have applied. If you use the button to format some text and an emphasis style to format other text, then changing the style does not change the text that you formatted with the button, even if you later apply the style to the text you bolded with the button. You must manually unbold the text and then apply the style.
Likewise, if you manually format your paragraphs using +, it is easy to end up with inconsistent paragraph formatting. This is especially true if you copy and paste paragraphs from other documents with different formatting. However, if you apply paragraph styles, formatting remains consistent. If you change a style, the change is automatically applied to all paragraphs formatted with that style.
You can use Writer to work on large documents. Large documents can be either a single file or a collection of files assembled into a single document.
The Navigator tool displays information about the contents of a document. It also lets you quickly jump to different elements. For example, you can use the Navigator to get a quick overview of all images included in the document.
To open the Navigator, click + or press F5. The elements listed in the Navigator vary according to the document loaded in Writer.

Click an item in the Navigator to jump to that item in the document.
If you are working with a very large document, such as a book, you might find it easier to manage the book with a master document, rather than keeping the book in a single file. A master document enables you to quickly apply formatting changes to a large document or to jump to each subdocument for editing.
A master document is a Writer document that serves as a container for multiple Writer files. You can maintain chapters or other subdocuments as individual files collected in the master document. Master documents are also useful if multiple users are working on a single document. You can separate each user’s section of the document into subdocuments collected in a master document, allowing multiple writers to work on their subdocuments at the same time without fear of overwriting others' work.
Procedure 2.1. Creating a Master Document
Click +.
or
Open an existing document and click ++.
Select in the navigator window and hold the button.
Move the mouse to and release the mouse button.
Select a file to add an existing file to the
master
      document
.
To create and add a new document to the master
document, choose +. The new file opens in
another OpenOffice.org Writer window. The content of the file will be integrated
in the master document. To save the file as part of
the master document, switch back to the master, enter
the filename into the open file menu and click .
To enter some text directly into the master document,
select +.
The OpenOffice.org help files contain more complete information about working with master documents. Look for the topic entitled Using Master Documents and Subdocuments .
| Styles and Templates in Master Documents |
|---|---|
The styles from all of your subdocuments are imported into the master document. To ensure that formatting is consistent throughout your master document, you should use the same template for each subdocument. Doing so is not mandatory. However, if subdocuments are formatted differently, you might need to do some reformatting to successfully bring subdocuments into the master document without creating inconsistencies. For example, if two documents imported into your master document include different styles with the same name, the master document will use the formatting specified for that style in the first document you import. | |
In addition to being a full-featured word processor, Writer also functions as an HTML editor. Writer includes HTML tags that can be applied as you would any other style in a Writer document. You can view the document as it will appear online, or you can directly edit the HTML code.
Procedure 2.2. Creating an HTML Document
Click ++.
Press F11 to open the window.
Click the arrow at the bottom of the window.
Select .
Create your HTML document, using the styles to tag your text.
Click +.
Select the location where you want to save your file, name the file, and select from the list.
Click .
If you prefer to edit HTML code directly, or if you want to see the HTML code created when you edited the HTML file as a Writer document, click +. In HTML Source mode, the list is not available.
The first time you switch to HTML Source mode, you are prompted to save the file as HTML, if you have not already done so.