Contents
- 2.1. Using the Main Menu
- 2.2. Managing Folders and Files with Nautilus
- 2.3. Accessing Floppy Disks, CDs, or DVDs
- 2.4. Searching for Files
- 2.5. Moving Text Between Applications
- 2.6. Managing Internet Connections
- 2.7. Exploring the Internet
- 2.8. E-mail and Scheduling
- 2.9. Opening or Creating Documents with OpenOffice.org
- 2.10. Controlling Your Desktop’s Power Management
- 2.11. Creating, Displaying, and Decompressing Archives
- 2.12. Taking Screen Shots
- 2.13. Viewing PDF Files
- 2.14. Controlling Sound
- 2.15. Using the Fingerprint Reader
- 2.16. Obtaining Software Updates
- 2.17. For More Information
Now you can start to work with your desktop. In this chapter you will learn how to start applications, manage and search files and burn CDs. You will get familiar with the power management concept of GNOME and find out how to perform regular tasks with your desktop.
Click on very the left of the bottom panel to open the main menu showing a list of your favorite applications together with the most recently used ones. You can also click to display your recent documents, or click to display your favorite places (such as your home directory or the Desktop). Click to access additional applications listed in categories. Use the options on the right to access Help, install additional software, open the GNOME Control Center, lock your screen, log out of the desktop or check the status of your hard drive and network connections.
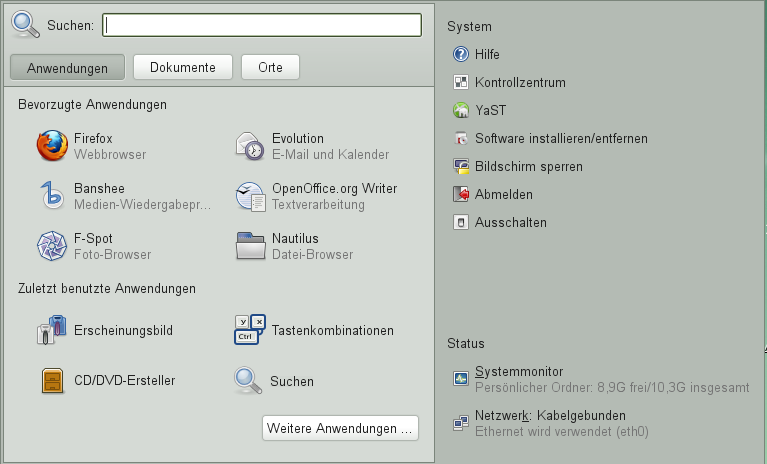
The contains several elements:
The search bar helps you find applications and files on your system. Enter your search phrase in the field, then press Enter. The results are displayed in the Desktop Search dialog box.
For more information about using Beagle, GNOME desktop’s search function, see Chapter 6, Searching with Beagle.
You can determine what type of items appear in the main menu by clicking the , or tabs.
By default, Favorite Applications shows icons for four commonly used applications. Customize this view to show the applications you use most often.
To add an item to your Favorite Applications:
Click +.
Right-click the application you want to add.
Select .
The selected application is added to your Favorite Applications.
To remove an item from your Favorite Applications:
Click .
Make sure that your Favorite Applications appear in the main menu. If does not appear on the main menu, click .
Right-click the item you want to remove.
Select .
Recent Applications shows the last two to four applications you have started, provided they do not already appear under Favorite Applications.
Click the tab to display Favorite and Recent Documents. Use this view to quickly locate the documents you worked on most often or most recently. Click to open the File Browser. You may move a document from the Recent to the Favorite Documents section by right clicking it and choosing .
The pane of the main menu provides shortcuts to several system applications.
Table 2.1. System Shortcuts
|
Application |
Description |
|---|---|
|
Help |
Opens the Help Center, which provides online documentation for your system. |
|
Control Center |
Allows you to customize and configure your desktop. For more information, see Chapter 3, Customizing Your Settings. |
|
YaST |
Allows you to customize and configure your system. |
|
Install Software |
Opens the Software Installer, which guides you through the process of installing new software. |
|
Lock Screen |
Locks your system so that nobody can access it while you are away. Enter your password to unlock the system. |
|
Log Out |
Opens the Log Out dialog, where you can log out or switch users. |
|
Shutdown |
Opens the Shutdown dialog, where you can shut down or restart your system. You can also suspend you computer from this shortcut. |
Use the Nautilus File Manager to create (or view) folders and documents, run scripts and create CDs of your data. In addition, the File Manager provides support for Web and file viewing.
You can open the File Manager in the following ways:
Click +.
Double-click your Home directory icon on the desktop.
Click +++.
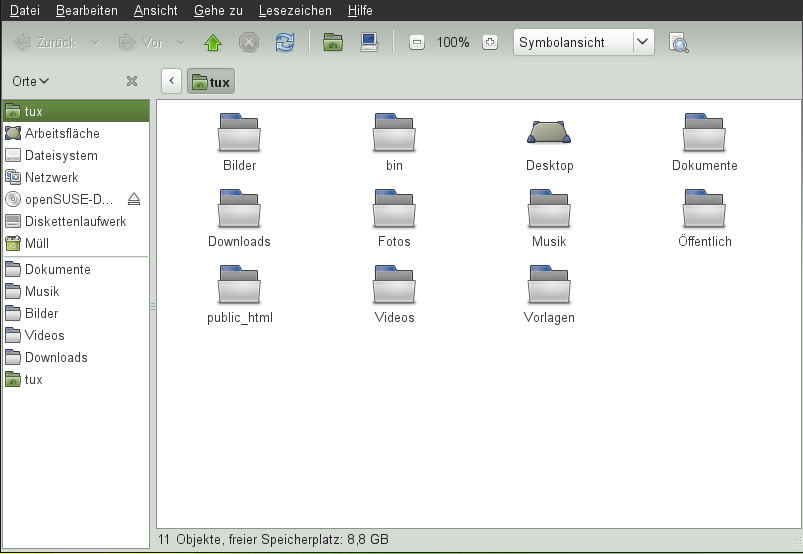
The elements of the Nautilus window include the following:
Menu. Lets you perform most tasks in the file manager. You can also open a context sensitive pop-up menu from a file manager window by right-clicking inside it. The items in this menu depend on where you right-click. For example, if you right-click a file or folder, you can select items related to the file or folder. If you right-click the background of a view pane, you can select items related to the display of items in the view pane.
Toolbar. Lets you quickly navigate among files and folders, and provides access to them.The toolbar contains Back, Forward, Up, Stop, Reload, Home, Computer, and Search buttons.
Location Bar. Lets you locate files, folders, and URI sites. The location bar supports two different views: the traditional text-based view (where you can enter or edit a path) and the button view (where each folder is displayed as a button). Navigate to a location by pressing a button.
Side Pane. Lets you navigate or display information about the selected file or folder. Use the drop-down list to customize what is shown in the pane. The list includes ways to view information about files, perform actions on files, add emblems to files, view a history of recently visited sites and display your files in the Tree system. To close the side pane, click the X at the top right of the side pane. To display the side pane, click + or press F9.
View Pane. Displays folders and files. Use the options in the menu to zoom the content or choose from different sorting options. You can also display items as a detailed list, a compact list or as icons.
Status Bar. Displays the number of items in a folder and gives the available free space. When a file is selected, the status bar displays the filename and size.
Some simple shortcuts for navigating in the File Manager include the following:
Table 2.2. File Manager Navigation Shortcuts
|
Shortcut |
Description |
|---|---|
|
<— or Alt+↑ |
Opens the parent folder. |
|
Arrow key |
Selects an item. |
|
Alt+↓ or Enter |
Opens an item. |
|
Shift+Alt+↓ |
Opens an item and closes the current folder. |
|
Shift+Alt+↑ |
Opens the parent folder and closes the current folder. |
|
Shift+Ctrl+W |
Closes all parent folders. |
|
Ctrl+L |
Toggles the location bar view from the button view to the text-based view. |
|
Alt+Home |
Opens your home directory. |
For more information, click + in the File Manager.
If you have files you would like to archive, you can compress the files into tape archive format (TAR).
In the Nautilus view pane, right-click the folder you want to archive, then click .
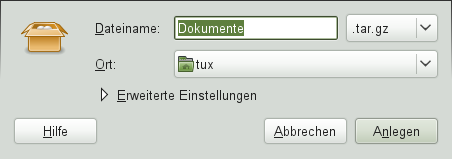
Accept the default archive filename or provide a new one.
Select a file extension from the drop-down list (use
tar.gzfor the most common archive form or.zipto ensure compatibility with Windows).Specify a location for the archive file, then click .
To extract an archived file, right-click the file, then select .
If your system has a CD or DVD read/write drive, you can use the Nautilus file manager to burn CDs and DVDs.
Click +++, or insert a blank disc and click or .
Drag and drop the files you want to put on the disc into the Nautilus window.
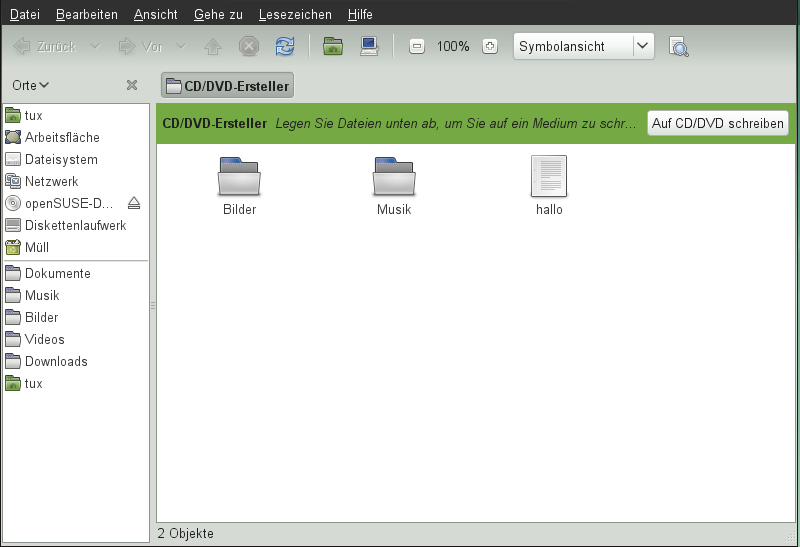
Click .
Modify the information in the Write to Disc dialog box or accept the defaults, then click .
The files are burned to the disc. This could take a few minutes, depending on the amount of data being burned and the speed of your burner.
To burn an iso image, right-click on the iso image file in Nautilus and choose . Modify the information in the Write to Disc dialog box or accept the defaults, then click .
You can also use the burning application Brasero to burn CDs or DVDs. See Chapter Brasero: Burning CDs and DVDs (↑Application Guide) for more information.
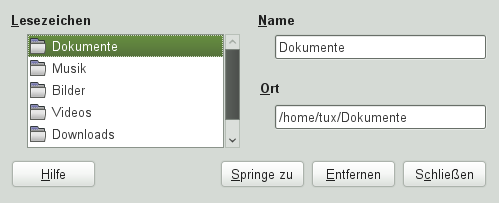
Use the Nautilus Bookmarks feature to mark your favorite folders.
Select the folder or item for which you want to create a bookmark.
Click +. The bookmark is added to the list, with the folder name as the bookmark name. When you bookmark a file, it is the folder that is actually bookmarked.
To select an item from your Bookmarks list, click , then click the desired bookmark in the list.
You can also organize your Bookmarks list by clicking + and making your selections in the dialog box.
 |
To change the order of your bookmarks, click a bookmark and drag it to the desired location.
You can change the File Manager preferences by clicking +. For more information, see Section 3.3.7, “Configuring File Management Preferences”.
You can utilize Nautilus to access files on remote servers. For more information see Chapter 5, Accessing Network Resources.
To access floppy disks, CDs or DVDs, insert the medium into the appropriate drive. An icon for the medium is automatically created on the desktop. For many types of removable media, a File Manager window pops up automatically when the media is inserted or attached to the computer. If File Manager does not open, double-click the icon for that drive to view the contents.
![[Warning]](admon/warning.png) | |
Do not simply remove disks from the drive after using them. Floppy disks, CDs, and DVDs must always be unmounted from the system first. Close all applications still accessing the medium, then right-click the icon for the medium and select or from the menu. Then safely remove the floppy disk, CD, or DVD when the tray automatically opens. | |
Using on the ++ menu, you can locate files on your computer or on a network share using any number of search criteria.
uses the find, grep and locate UNIX commands. All searches are case insensitive.
You can also open the dialog by entering the following command into the Run Application dialog (started with Alt+F2):
gnome-search-tool
Start .
Type the search text in the field.
The search text can be a filename or partial filename, with or without wild cards, as shown in the following table:
Search Text
Example
Result
Full or partial filename
myfile.txt
Searches for all files that contain “myfile.txt” in the filename.
Partial filename combined with wild cards (* [ ])
*.[ch]
Searches for all files that have a .c or .h extension.
In the field, choose the directory where you want to begin the search.
Click .
Use to search by file content, dates, owner or file size.
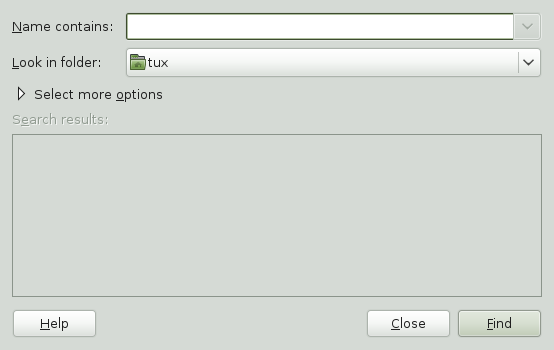
Start .
Type the search text in the field.
In the field, type the path to the directory where you want Search for Files to begin the search.
Click , then click
Select a search option that you want to apply, then click .
The following options are available:
Option
Description
Searches for a file by filename. Type a full filename or a partial filename with wild cards in the field provided. Use an asterisk (*) to indicate a sequence of characters. Use a question mark (?) to indicate a single character. The search is case sensitive.
Searches for files that were modified within the period specified (in days).
Searches for files that were modified before the period specified (in days).
Searches for files that are equal to or larger than the size specified (in kilobytes).
Searches for files that are smaller than or equal to the size specified (in kilobytes).
Searches for empty files.
Searches for files that are owned by the user specified. Type the name of the user in the text box provided.
Searches for files that are owned by the group specified. Type the name of the group in the text box provided.
Searches for files that are owned by a user or group that is unknown to the system.
Searches for filenames that do not contain the string that you enter. Enter a full filename or a partial filename with wild cards in the field provided. Use an asterisk (*) to indicate a sequence of characters. Use a question mark (?) to indicate a single character. The search is case sensitive.
Searches for files that contain the specified regular expression in their directory path or filename. Type the regular expression in the text box provided.
Regular expressions are special text strings used to describe a search pattern. For more information, see http://www.regular-expressions.info.
Includes hidden and backup files in the search.
Follows symbolic links when searching for files.
Searches only in directories that are on the same file system as the start directory.
Specify the required search information for the search option.
To remove a search option from the current search, click the button next to the option.
Click .
You can use the Search Results list to open or delete a file found during a search, or you can save the search results to a file.
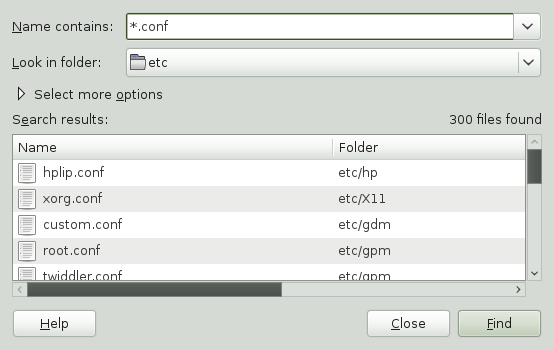
To open a file displayed in the Search Results list, right-click the file, then click or double-click the file. To open the folder that contains a file displayed in the Search Results list, right-click the file and click .
To delete a file displayed in the Search Results list, right-click the file and click .
To save the results of the last search that performed, right-click anywhere in the Search results list and click . Type a name for the file that will contain your Search results and click .
By default, tries to speed up some searches by using the locate command. locate provides a secure way to index and quickly search for files. Because locate relies on a file index, the list might not be up to date. To disable quick searches, run the following command in a terminal window:
# gconftool-2 --type=bool --set /apps/gnome-search-tool/disable_quick_search 1
To copy text between applications, select the text, then move the mouse cursor to the position where you want the text pasted. Click the center button on the mouse or the scroll wheel to paste the text.
When copying information between programs, you must keep the source program open and paste the text before closing it. When a program closes, any content from that application that is on the clipboard is lost.
To surf the Internet or send and receive e-mail messages, you must have configured an Internet connection with YaST. Depending on your environment, in YaST select whether to use NetworkManager. In GNOME, you can then establish Internet connections with NetworkManager as described in Abschnitt „Verwendung des GNOME NetworkManager-Miniprogramms“ (Kapitel 5, Verwenden von NetworkManager, ↑Start).
For a list of criteria to help you to decide whether to use NetworkManager, refer to Abschnitt „Anwendungsbeispiele für NetworkManager“ (Kapitel 5, Verwenden von NetworkManager, ↑Start).
The GNOME desktop includes Firefox, a Mozilla*-based Web browser. You can start it by clicking +.
You can type an address into the location bar at the top or click links in a page to move to different pages, just like in any other Web browser.
For more information, see Chapter Browsing with Firefox (↑Application Guide).
For reading and managing your mail and events, openSUSE offers you Evolution, a groupware program that makes it easy to store, organize and retrieve your personal information.
Evolution seamlessly combines e-mail, a calendar, an address book, and a memo and task list in one easy-to-use application. With its extensive support for communications and data interchange standards, Evolution can work with existing corporate networks and applications, including Microsoft* Exchange.
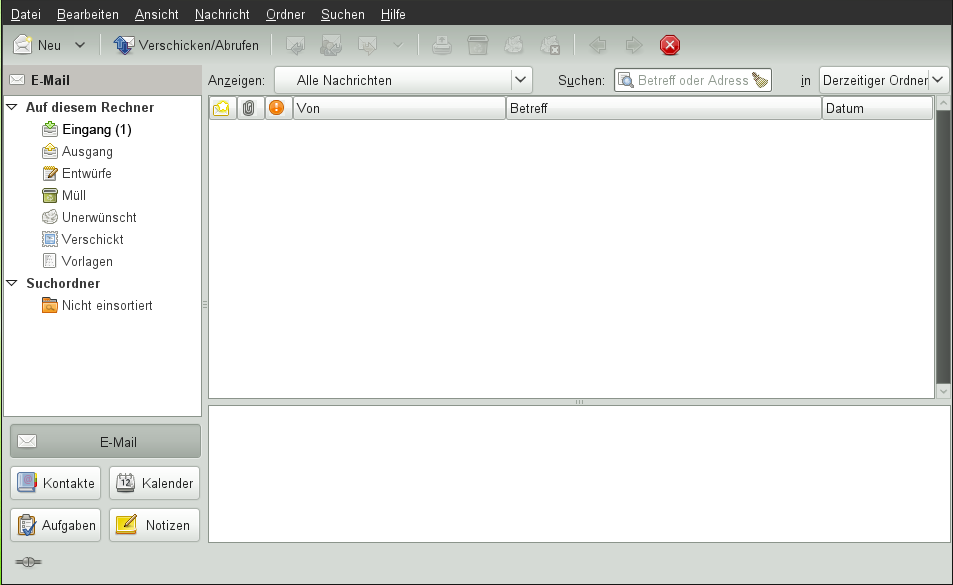 |
To start Evolution, click +++.
The first time you start Evolution, it prompts you with a few questions as it sets up a mail account and helps you import mail from your old mail client. Then it shows you how many new messages you have and lists upcoming appointments and tasks. The calendar, address book and mail tools are available in the shortcut bar on the left.
For more information, see Chapter Evolution: E-mailing and Calendaring (↑Application Guide).
For creating and editing documents, OpenOffice.org is installed with the GNOME desktop. OpenOffice.org is a complete set of office tools that can both read and save Microsoft Office file formats. OpenOffice.org has a word processor, a spreadsheet, a database, a drawing tool and a presentation program.
To get started, click + or select an OpenOffice.org module by clicking ++and selecting the module you want to open.
A number of sample documents and templates are included with OpenOffice.org. You can access the templates by clicking ++. In addition, you can use wizards, which guide you through the creation of letters and other typical documents.
For more information, see Chapter The OpenOffice.org Office Suite (↑Application Guide) or view the in any OpenOffice.org program.
GNOME Power Manager is a session daemon for the GNOME desktop that manages the power settings for your laptop or desktop computer. When running on battery, the GNOME Power Manager displays a battery icon showing the battery state in the panel. When hovering the mouse over the icon, a pop-up with more information is shown. To view detailed information about the batteries current state, left-click the icon and choose . On certain events, such as a critically low battery state, the GNOME Power Manager will display notifications informing you about the event.
GNOME Power Manager is usually started automatically when GNOME starts, but you can manually start GNOME Power Manager by using the following command:
gnome-power-manager --verbose --no-daemon
The statistics program lets you view the power consumption of your laptop hardware in graphic form. To access the statistics graphs, right-click the battery icon and choose , or click +++.
The Power History graph shows the power history charge used by the composite primary battery. The line represents the amount of power that is either being used to charge the batteries in the system or the power being used by the system from the batteries. You should see the line go up when processor intensive tasks are performed, and go down when the system is at idle (or when the screen is dimmed). A legend is shown with this graph when data events have been received.
You will not receive rate data from your computer if it is not charging or discharging, or if the computer is suspended. This is due to hardware limitations (where the rate is only sent from the battery management chip, rather than the power management chip on the motherboard).
Depending on your hardware, other graphs will be available from the menu. You might also see additional hardware that can be accessed via the optional button.
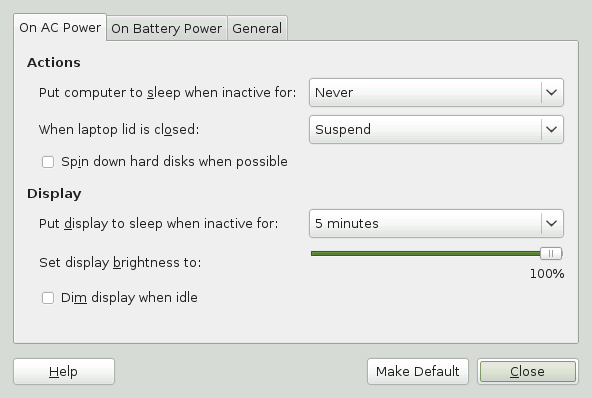
The Power Management Preferences dialog box lets you control the LCD brightness when your system is on AC or battery power, the idle time for the screen power-down and suspend action, the actions to perform when the laptop lid is closed and the notification area icon policy.
To access Power Management Preferences, right-click the battery icon and choose , or click +++.
Use the options on the On AC Power dialog box to automatically put your computer to sleep when it has been inactive for a specified amount of time. When your computer is asleep, it is turned on but in a low power mode (suspend to RAM). It takes less time for a computer to wake up from sleep than it does for the computer to start up after being turned off.
You can also set only the display to sleep and adjust the display brightness. If your computer is in the middle of a task (for example, burning a DVD) that you want to finish while you are away, set only the display to sleep.
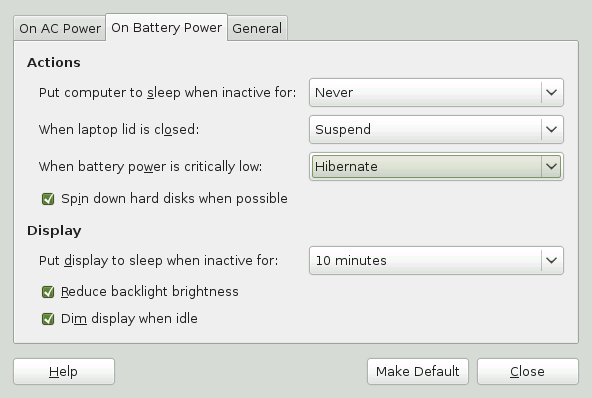
Use the options on the On Batter Power dialog box to automatically put your computer to sleep when it has been inactive for a specified amount of time, to specify what happens when the laptop lid is closed, and what happens when battery power is critically low.
When your computer is asleep, it is turned on but in a low power mode (suspend to RAM). It takes less time for a computer to wake up from sleep than it does for the computer to start up after being turned off.
You can also set only the display to sleep. If your computer is in the middle of a task (for example, burning a DVD) that you want to finish while you are away, set only the display to sleep.
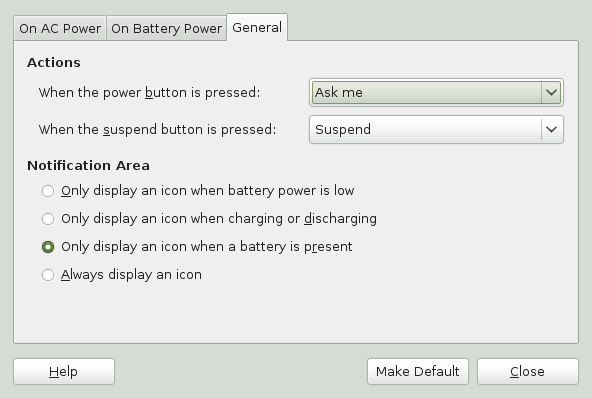
Use the options on the General Power Management Preference dialog box to configure miscellaneous options related to GNOME Power Manager’s behavior, such as the actions to perform when the power or suspend buttons are pressed, if an icon is displayed in the Notification area and if sound is used to notify you in the event on an error.
gnome-screensaver is a session daemon that monitors
user input (if the mouse has or has not been moved and if the keyboard
has or has not been pressed) then starts a timeout. When the value of
this timeout reaches the value set in Screensaver Preferences (using the
option), then the
login is marked as “session idle.”
As soon as the session is marked idle, GNOME Power Manager starts it's own system timer. When the timeout set in GNOME Power Manager Preferences is reached, and the CPU load is idle, then the idle action is performed (such as turning off the screen, suspending or hibernating the computer).
To make this clearer, the sliders in GNOME Power Manager Preferences are set to start at the value of the session-timeout + 1 minute, as GNOME Power Manager Preferences cannot logically trigger before the session is marked as idle. If you adjust the value of the session idle timeout in Screensaver Preferences, the start time of the sliders in GNOME Power Manager Preferences will change accordingly.

To access the screen saver preferences, click +++. For more information, see Section 3.3.4, “Configuring the Screen Saver”.
You can use the Archive Manager application (also known as File Roller)
to create, view, modify or unpack an archive. An archive is a file that
acts as a container for other files. An archive can contain many files,
folders and subfolders, usually in compressed form. Archive Manager
application supports common formats such as zip,
tar.gz, tar.bz2,
lzh, and rar. You can use
Archive Manager to create, open and extract a compressed non-archive
file.
To start Archive Manager, click +++. If you already have a compressed file, double-click the filename in the Nautilus file manager to view the contents of the archive in Archive Manager.

In Archive Manager, click +.
Select the archive you want to open.
Click .
Archive Manager automatically determines the archive type, and displays the following:
The archive name in the window title bar.
The archive contents in the display area.
The total number of files in the archive and the size of the archive when uncompressed, in the status bar.
To open another archive, click + again. Archive Manager opens each archive in a new window. To open another archive in the same window, you must first click + to close the current archive, then click +.
If you try to open an archive that was created in a format that Archive Manager does not recognize, the application displays an error message.
In Archive Manager, click +.
Specify the name and location of the new archive.
Select an archive type from the drop-down list.
Click .
Archive Manager creates an empty archive, but does not yet write the archive to disk. Archive Manager writes a new archive to disk only when the archive contains at least one file. If you create a new archive and quit Archive Manager before you add any files to the archive, Archive Manager deletes the archive.
Add files and folders to the new archive:
Click + or + and select the files or folders you want to add.
Click .
Archive Manager adds the files to the current folder in the archive.
You can also add files to an archive in a file manager window without opening Archive Manager. See Section 2.2.2, “Archiving Folders” for more information.
In Archive Manager, select the files that you want to extract.
Click +.
Specify the folder where Archive Manager will extracts the files.
Choose from the following extract options:
Option
Description
All files
Extracts all files from the archive.
Selected files
Extracts the selected files from the archive.
Files
Extracts from the archive all files that match the specified pattern.
Re-create folders
Reconstructs the folder structure when extracting the specified files.
For example, you specify
/tmpin the text box and choose to extract all files. The archive contains a subfolder calleddoc. If you select the option, Archive Manager extracts the contents of the subfolder to/tmp/doc. If you do not select the option, Archive Manager does not create any subfolders. Instead, Archive Manager extracts all files from the archive, including files from subfolders, to/tmp.Overwrite existing files
Overwrites any files in the destination folder that have the same name as the specified files.
If you do not select this option, Archive Manager does not extract the specified file if an existing file with the same name already exists in the destination folder.
Do not extract older files
Extracts the specified file only if the destination folder does not contain the specified file or if the destination folder contains an older version of the specified file. Archive Manager uses the modification date to determine which file is the most recent. If the version of the file in the archive is older, Archive Manager does not extract the specified file to the destination folder.
This option is only available if the option is selected.
Password
This option is available only if the archive type supports encryption. Currently, only
.zipand.arjarchives support encryption.If the archive contains encrypted files, enter the required password in the field to decrypt the specified files during the extraction process. The required password is the encryption password that was specified when the archive was created.
Click .
If all of the files in the archive are protected by a password (and you have not specified the password) Archive Manager displays an error dialog.
If some but not all of the files in the archive are protected by a password (and you have not specified the password) Archive Manager does not display an error dialog. However, Archive Manager extracts only the unprotected files to the new archive.
To extract an archived file in a file manager window without opening Archive Manager, right-click the file and select .
The Extract operation extracts a copy of the specified files from the archive. The extracted files have the same permissions and modification date as the original files that were added to the archive.
The Extract operation does not change the contents of the archive.
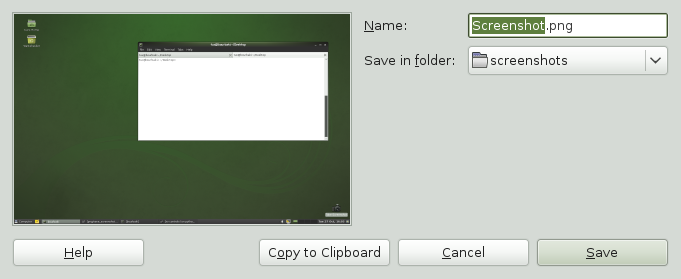
You can take a snapshot of your screen or an individual application window using the Take Screenshots utility. Start it by pressing Print to take a screen shot of the entire desktop or by pressing Alt+Print to take a screen shot of the currently active window or dialog box. You may also start the application via +++.
When you take a screen shot, the Save Screenshot dialog box opens. To save the screen shot as an image file, enter the filename for the screen shot and choose a location from the drop-down list.
You can also use GIMP to take screen shots. In GIMP, click ++, select an area, choose a delay and then click .
Documents that need to be shared or printed across platforms can be saved as PDF (Portable Document Format) files. openSUSE ships with the Evince PDF Viewer.
To open Evince, double-click a PDF file in a file manger window (or Web site) or press Alt+F2, type evince and press Enter.
To view a PDF file in Evince, click +, locate the desired PDF file and click .
Use the navigation icons at the top of the window or the thumbnails in the left panel to navigate through the document. If your PDF document provides bookmarks, you can access them in the left panel of the viewer.
YaST automatically identifies and configures the sound cards in your computer. You can also use the YaST Hardware module to configure your sound card manually. When your sound card has been configured, you can control the volume and balance of the sound with the GNOME Volume Control mixer.
GNOME uses the PulseAudio sound server by default. PulseAudio allows to control audio “streams” of different programs with one GUI. It is then, for example, possible to use two different programs generating audio output at the same time by sending their output to different devices such as headphones and speakers.
If the mixer icon (a loudspeaker symbol) is not visible in the panel on your desktop, press Alt+F2 and enter gnome-volume-control, or click +++.
Left-click on the mixer icon and move the slider up or down to change the overall volume. Right-click and choose for a detailed configuration dialog.
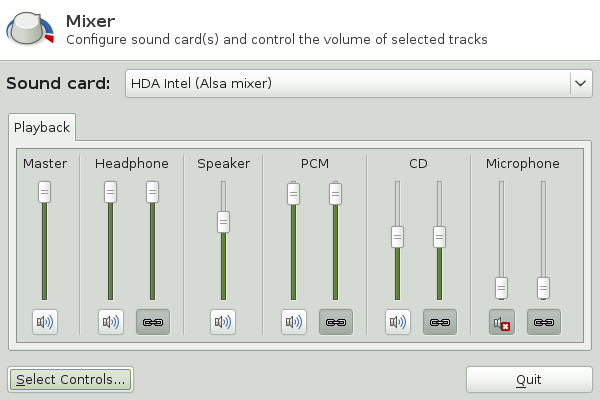
The GNOME Volume Control dialog box contains the following tabs:
- Sound Effects
Shows a list of all the sound themes available, along with several alert sounds to choose. By slider, you can adjust the volume level of alert sounds.
- Hardware
Lists hardware sound devices present and configured on your system. Here you can set the mode in which you want the device to operate.
- Input
Lists sound devices from which you choose the input sound device, and the preferred audio input, such as microphone. Contains a slider to change the input device volume, and an option to mute the input entirely.
- Output
Lists sound devices from which you choose the output sound device. You can adjust detailed settings for the device, such as sound balance.
- Applications
Lists all application currently playing a sound file, or recording audio.
If your system includes a fingerprint reader, users can log in to the system either by swiping a finger on the fingerprint reader or by typing in a password. For more information, refer to Chapter Using the Fingerprint Reader (↑Security Guide).
When you connect to the Internet, the openSUSE Updater automatically checks whether software updates for you system are available. An openSUSE Updater applet in the system tray of you panel informs you of the availability of updates and lets you easily install them with just a few clicks. The applet icon changes color and appearance depending on the availability of updates for your system.
For detailed information on how to install software updates with openSUSE Updater and how to configure openSUSE Updater, refer to the chapter about installing and removing software in Abschnitt „Halten Sie Ihr System auf dem neuesten Stand“ (Kapitel 3, Installieren, Entfernen und Aktualisieren von Software, ↑Start).
Along with the applications described in this chapter for getting started, GNOME can run many other applications. Find detailed information about these important applications in the other parts of this manual and in the Application Guide (↑Application Guide).
To learn more about GNOME and GNOME applications, see http://www.gnome.org and http://gnomefiles.org.
To report bugs or add feature requests, go to http://bugzilla.gnome.org.