Contents
F-Spot is a management tool for your collection of digital images tailored for the GNOME desktop. It allows you to assign different tags to your images in order to categorize them and offers various image editing options. For example, you can remove red-eye, crop, and adjust brightness and colors. F-Spot supports sixteen common file types, including JPEG, BMP, GIF, TIFF, and RAW.
You can import photos from your hard drive, your digital camera, or your iPod. You can also use F-Spot to view slide shows, create photo CDs, generate a Website gallery, or export your photos to your Flickr, 23, Picasa Web, or SmugMug account.
To access F-Spot, click +. The first time you run F-Spot, you can tell it where to find the images you want to import into your collection. If you already have a collection of images stored on your hard drive, enter the path to the relevant directory and optionally include subfolders. F-Spot imports these images into its database.

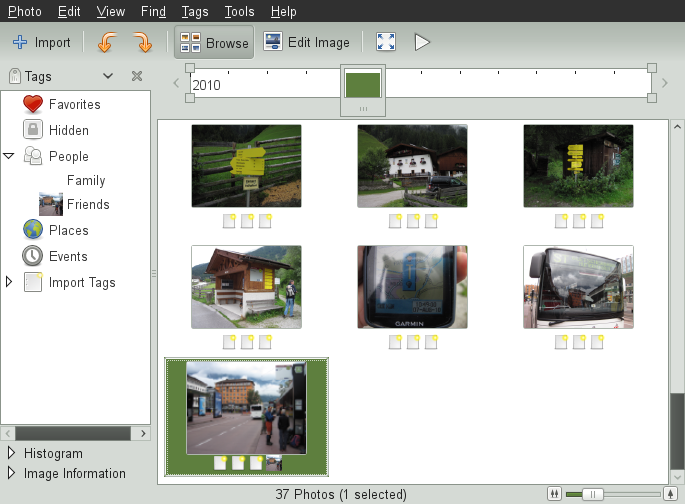
Thumbnails of your images are displayed in the right part of the window, and detailed information for a selected image is displayed in a sidebar to the left. By default, your photos are displayed in reverse-chronological order, so your newest photos are always at the top. You can sort your photos in chronological order by clicking +.
![[Tip]](admon/tip.png) | Contents of the Sidebar |
|---|---|
At the top of the sidebar, change its contents from to , , or . If the sidebar is not visible at all, press F9 or click ++ to make the sidebar visible. | |
A menu bar at the top of the window allows you to access the main menus. A toolbar below the menu bar offers the following options (move the mouse over the icons to see the tooltip, if there is an icon without descriptive text):
Table 18.1. F-Spot Toolbar
|
Icon |
Description |
|---|---|
|
Import |
Import new images from various media such as a folder on your hard drive or your digital camera. |
|
Rotate (Left or Right) |
Use this shortcut to change an image's orientation. |
|
Browse |
The Browse mode allows you to view and search your entire collection or tagged subsets of it. You can also use the time line to search images by creation date. |
|
Edit Image |
This mode allows you to select one image and do some basic image processing. Details are available in Section 18.7, “Basic Photo Editing”. |
|
Fullscreen |
Switch to fullscreen display mode. |
|
Slideshow |
Start a slide show. |
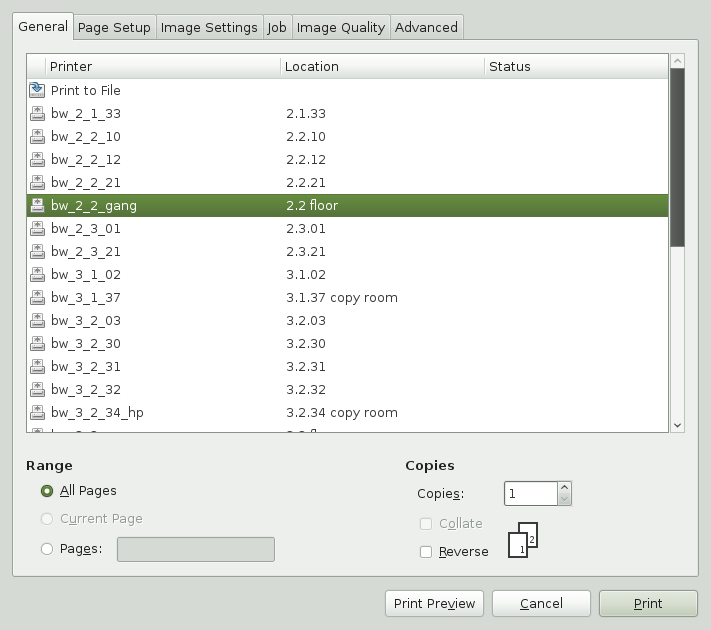
You can import photos from your hard drive or from your digital camera (see Section 18.2, “Downloading Pictures from Your Camera” for more information). F-Spot automatically makes copies of photos imported from your hard drive. If you do not want to copy images, uncheck on the Import dialog box, or press Shift when dragging photos into F-Spot.
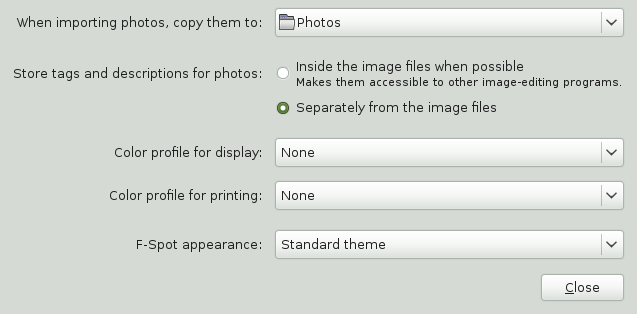
By default, F-Spot copies your photos to the Photos
directory in your home directory. You can change the directory F-Spot
uses by clicking +.
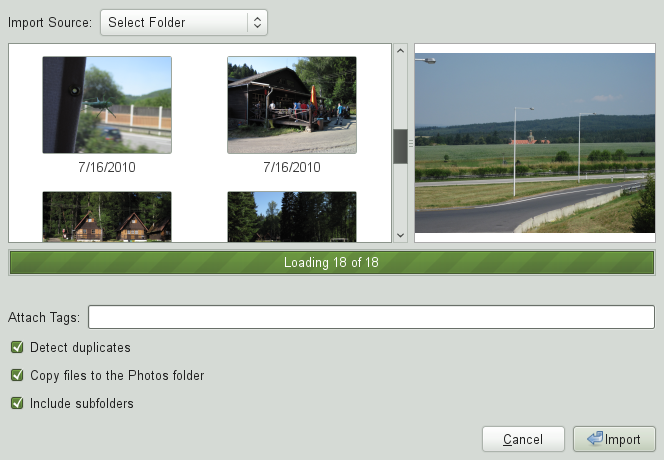
If all the photos you are importing are from a particular event, or if they have some other characteristic in common, you can create a tag for them so you can easily find them at a later time. Enter the tags that you want to associate on the import of all new photos (separated by commas) in the field.
To import photos:
Click +.
Select an , then click .
After the photos are finished loading, click .
The photos are added to your catalog.
You can import new images from your digital camera by connecting it to the USB port of your computer. The camera type is detected automatically. When you import photos from your camera, F-Spot makes copies of them so that you can clear your camera's memory.
Click +. The files will be copied to the target directory specified via .
Select your camera as the .
F-Spot launches a preview window displaying all the images that are available for download from your camera. Tagging can be done on import, if you enter the appropriate tags in the field. If you do not want to import all the images on your camera to your database, just deselect the unwanted ones in the preview window.
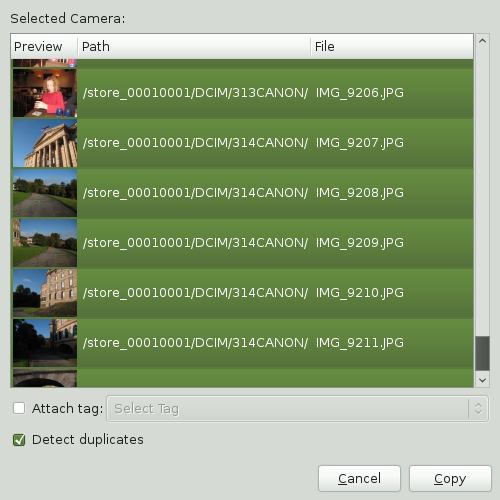
Click .
When the photo transfer is complete, click .
The photos are added to your catalog.
When you select an image, some basic statistical information is displayed in the lower-left part of the window. This includes the filename, its version (copy or original image), the date of creation, size, and the exposure used in creating this particular photo.
To view more detailed information on a photo (including the EXIF data associated with the file), select below the button, then click .
Use tags to categorize any of your photos to create manageable subsets of your collection. F-Spot comes with default tags, but you can change them and add new ones. If, for example, you want to organize your collection of portrait shots of your loved ones, do the following:
Select the mode of F-Spot.
Activate the view in the sidebar to the left.
In the sidebar, right-click the category, then select .
Create a new tag called Friends.
Create a new tag called
Family.The new tags appear as subcategories below the category.
Attach tags to images or groups of selected images.
Right-click an image, select , then select the appropriate tag for this image. To attach a tag to a sequence of images, click the first one, then press Shift and select the other ones without releasing the Shift key. To attach a tag to a group of selected images, press and hold Control and select the images. Right-click for the tag menu and select the matching category.
You can also use the following methods to tag photos:
Drag and drop a photo onto a tag.
Drag and drop a tag onto a photo.
Use the options on the menu.
Select a photo, then press t to display the entry bar.
The first photo you associate with a tag is used for that tag's icon. To edit a tag's name, parent tag, or icon, right-click the tag, then select .
You can change a tag's parent by dragging and dropping it where you want. You can also edit the name of a tag by selecting it and pressing F2.
After your photos have been tagged, you can browse your collection by tags. Using our earlier example, clicking + limits the displayed collection to the photos tagged Family. Searching your collection by tag is also possible through +. The result of your search is displayed in the thumbnail overview window.
Removing tags from single images or groups of images works similarly to attaching them. The tag editing functions are also accessible on the menu in the top menu bar.
As mentioned in Section 18.4, “Managing Tags”, tags can be used as a means to find certain images. Another way to find images is to use the below the toolbar. By dragging the little frame along this time line, you can limit the images displayed in the thumbnail overview to those taken in a selected time frame. F-Spot starts with a default time line, but you can edit the time span by moving the sliders to the right and left of the time line.
You can also start a search by clicking +. With the find bar displayed, you can drag tags from the tag view to the find bar.
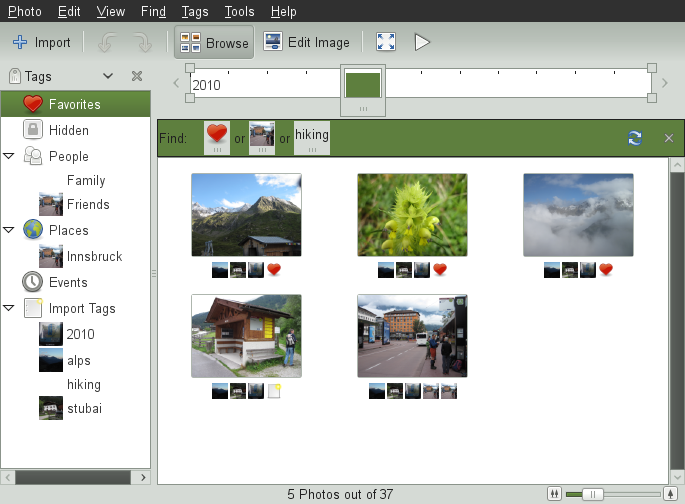
To find photos that are tagged with more than one tag, select the first tag in the tag view (or drag the tag onto the Find bar), then drag the second tag and drop it on top of the first. You can also right-click the second tag in the tag view, or click +, then select the first tag (or group of tags).
You can search for photos that do not have a particular tag by double-clicking a tag in the Find bar. Photos that do not have that tag (or any tag at all) are displayed. You can also right-click a tag in the Find bar, then select .
To remove a tag from the search, drag it away from the Find bar, or right-click the tag and select .
By default, photos tagged Hidden will not be shown. You must explicitly include the Hidden tag in your search to show such photos.
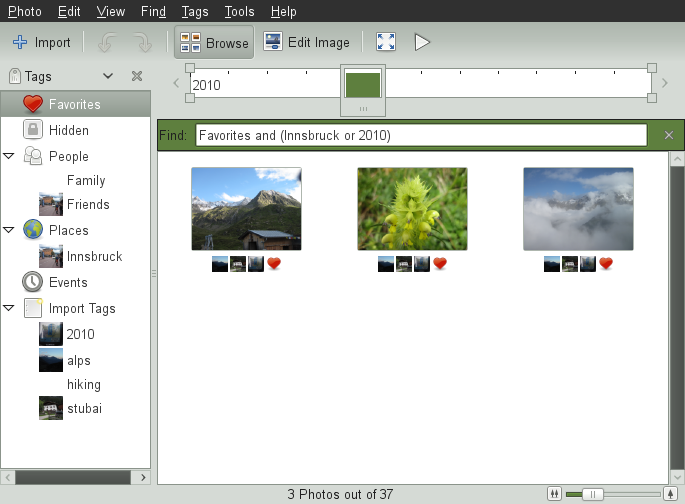
There is also a type-to-find entry. Press the forward slash (/) to open it. It cannot be used at the same time as the Find bar. You can type queries such as “TagA and (TagB or (TagC and TagD))”. At any point, if F-Spot recognizes what you have typed as a valid query, it will update your search. The not operator is not yet supported.
F-Spot offers a range of export functions for your photo collections: Section 18.6.1, “Generating a Website Gallery”, Section 18.6.2, “Exporting Photos to CD”, Section 18.6.3, “Exporting Photos to a Folder”, and Section 18.6.4, “Posting to a SmugMug, Flickr, 23hq, Zooomr, or Picasa Web Albums Account”.
If you use the PHP software known as Gallery, you can post your photos to your existing album. Ensure that the Remote module in your Gallery installation is enabled (++).
PennAve is another dynamic photo gallery application. It is designed to be used in conjunction with F-Spot to organize and manage your photos.
Select the photos you want to export.
Click ++
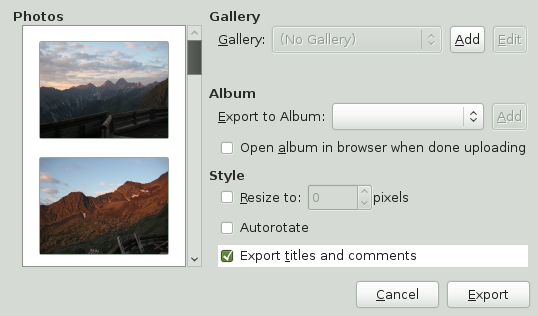
Select the gallery you want to export your images to, or click to add a new gallery.
F-Spot establishes a connection to the Web location entered for your web gallery.
Select the album you want to export the images to, then specify whether to resize and rotate the images automatically and export titles and comments.
Click .
Select the photos you want to burn to CD.
Click ++, then click .
F-Spot copies the files and opens the dialog—in case of trouble it just tries to write an ISO file via the dialog. Click to confirm the operation.
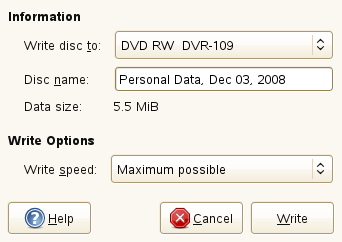
Assign a name to your image disk, then select the writing speed.
Click to start the CD writing process.
Select the photos you want to export.
Click ++.
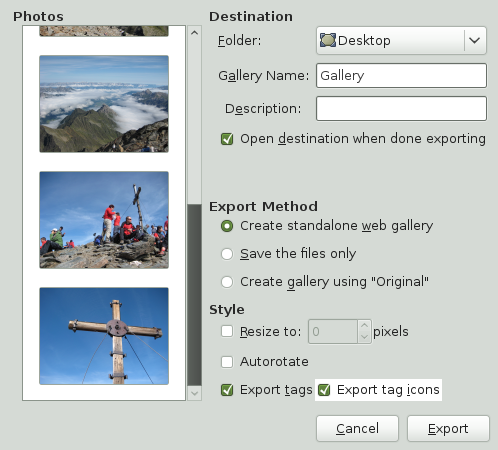
Choose from the following export methods:
Create standalone web gallery: Export your photos to an interactive Website, ready for you to upload.
Save the files only: Export your photos as files within directories, without putting them into a gallery.
Create gallery using “Original”: Export your photos ready for use with Jakub Steiner's Original Photo Gallery software.
Click .
If you use SmugMug, Flickr, 23hq, Zooomr, or Picasa Web Albums, you can post your files directly from F-Spot to your account.
Select the photos you want to export.
Click ++, , , , or .
Select or unselect the options you want in the Export dialog box.
The options displayed on the Export dialog box depend on the type of account you are exporting to. For example, Flickr and 23hq exports require authorization in order to upload photos. To do this, click to open a Web browser, then log in to your account.
Click .
F-Spot offers several basic image editing functions, such as the ability to crop, remove red-eye, and adjust color and brightness.
When you edit a photo, a new copy (called a version) is created, so your original photo is never altered. After your first edit to a photo, subsequent edits modify the same version. If you want to create multiple versions of a photo (for example, with different cropping or coloring), click +. To access a photo's original version, click ++.
Select the photo you want to edit.
To enter edit mode, click the icon in the toolbar, double-click the image, or press Enter.
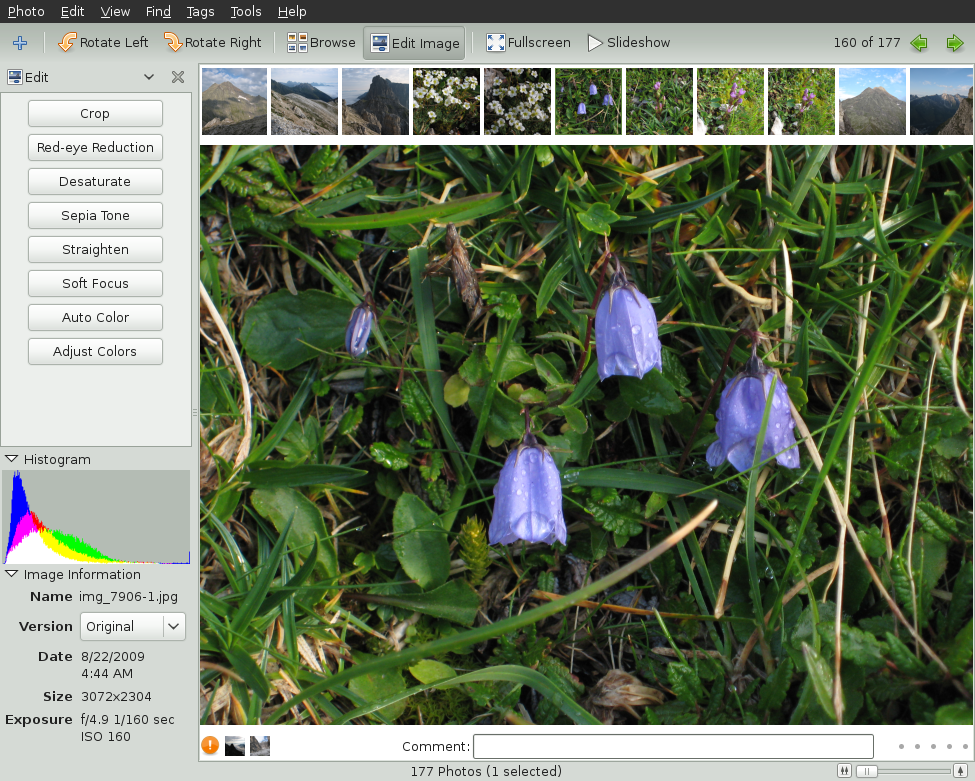
Choose from the following edit functions, using the buttons of the sidebar to the left or the entries from the menu:
Function
Description
Crop
Cropping an image is a great way to improve the quality of a photograph by improving how it is framed. You crop a photo by selecting the part of the photo you want to keep. If you want your photo to be the exact dimensions necessary for a certain print size, you can constrain the kind of selection F-Spot will allow you to draw by choosing the appropriate size from the drop-down list. See the description of the Remove Red-Eye function for details on making a selection on your photo.
After you make your crop selection, click the icon beneath the photo to finalize the crop. If you are working with the original photo, cropping creates a new version of your photo.
Red-Eye Reduction
To remove red-eye from a photo, select a zone containing the eyes. You might want to zoom in on the image to accurately select the eyes in the photo. You should be able to correct both eyes on the same person at once, or even the eyes from multiple people at once. If this does not work, or if the selected zone contains some vivid red parts (such as lips), you will probably have to correct one red eye at a time.
To make your selection, click one corner of the rectangle that will be your selection, then drag your mouse to the diagonal corner and release it. You can resize your selection by dragging its edges, and you can move it by clicking in the middle of it and dragging it to where you want it.
After you have selected a zone, remove the red by clicking the icon beneath the photo.
Desaturate
Converts the photo to black and white.
Sepia Tone
Converts the photo to sepia tones.
Straighten
The Straighten effect helps you level a photo and is useful when editing landscapes taken without a tripod (when the imaginary line of horizon is not at 0°). This tool rotates a photo by a specified angle and automagically crops the resulted image so that you always see a perfect rectangle.
Soft Focus
Sharpening one region of a picture while blurring all the rest is a way to emphasize a particular area and grab attention. The soft focus effect is a way to emulate a lens that allows shooting with a short distance in front of and beyond the subject that appears to be in focus.
Choose the central point of the area you want to be in focus, then click the icon beneath the photo. Adjust the amount of blurring, then click .
Auto Color
This effect automatically adjusts color levels to make a color-balanced picture. It works best for pictures taken with automatic white balance. Click the icon to access this feature.
Adjust Colors
To adjust the brightness, contrast, and colors of a photo, click the icon to open the adjustment dialog box. Change the settings you want, then click .
Adjust Time
Access this function by clicking +. Adjust date and time, then click .
Sharpen
Access this function by clicking +. Adjust the values for , , and to your needs, then click .
Comment
You can add a description or a comment to a photo by clicking the text entry box below the photo and entering text.
(Optional) If you want to edit another photo, use the arrow keys on the toolbar at the right to switch to a new photo.
To exit the edit mode, click on the toolbar.
| |
Professional image editing can also be done with GIMP. For more information, see Chapter 16, Manipulating Graphics with GIMP. | |
You can use either of the following methods to share your photos using F-Spot. Both methods share only the photos you have selected when you run them.
You can e-mail your photos directly from F-Spot, sending them as-is (original size) or resizing them.
Select the photos you want to e-mail.
Click +.
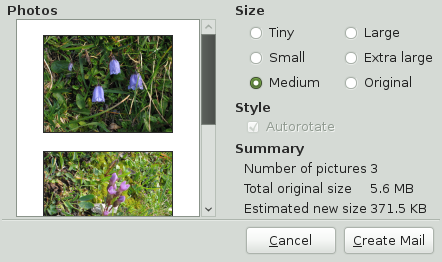
Select a size for your photos.
Click .
Your default e-mail program opens, with your photos attached to a new mail message.