Contents
Abstract
Included with your openSUSE® is the Mozilla Firefox Web browser. With features like tabbed browsing, pop-up window blocking and download and image management, Firefox combines the latest browsing and security technologies with an easy-to-use interface. Using tabs, you can view more than one Web page in a single window. You can suppress annoying advertisements and disable images for faster browsing. Firefox's easy access to different search engines helps you find the information you need.
Start Firefox from the main menu or by entering the command firefox. The main program features are described in the following sections.
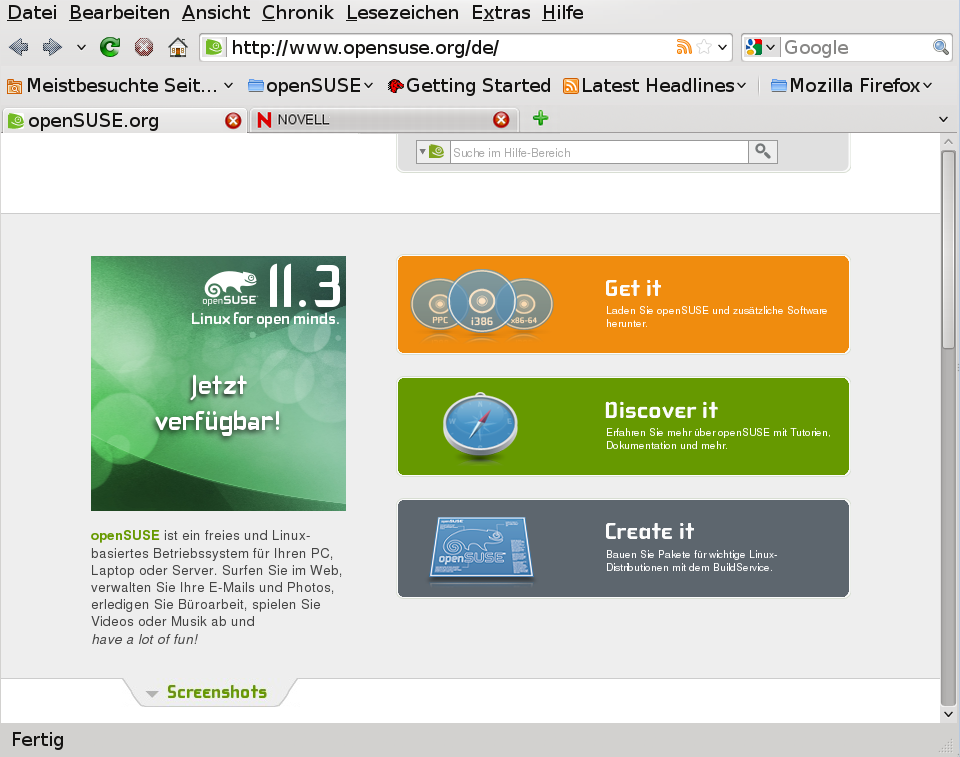
Firefox has much of the same look and feel as other browsers. It is shown in Figure 14.1, “The Browser Window of Firefox”. The navigation toolbar includes and , the smart location bar for a Web address, and the search bar. Bookmarks are also available for quick access from the bookmarks toolbar. For more information about the various Firefox features, use the menu.
When typing into the location bar, an auto-completion drop-down menu opens, showing the addresses matching what you have typed. The phrase that is matched is highlighted with bold letters. The drop-down menu shows all matching addresses, bookmarks, page titles and tag names from your browsing history and your bookmarks list. Matching even works across word boundaries. Entries visited most frequently and recently are listed first.
List entries from the bookmark list are marked with a star. Bookmarks with tags are marked with an additional label followed by the tag names. List entries from the browsing history are not marked.
Use ↑ and ↓ or the mouse wheel to scroll through the list. Press Enter or click on an entry to go to the selected page. Del removes an entry from the list if it is an entry from the history. Bookmarked entries can only be removed by deleting the associated bookmark.
Firefox offers two zooming options: page zoom, the default, and text zoom. Page view zooms the entire page as is, with all elements of a page, including graphics, expanding equally while text zoom only changes the text size.
To toggle between page and text zoom, choose ++. To zoom in or out either use the mouse wheel while holding the Ctrl key, or use Ctrl++ and Ctrl+-. Reset the zoom factor with Ctrl+0
If you often use more than one Web page at a time, tabbed browsing makes it easier to switch between pages. It allows you to load Web sites in separate tabs within one window.
- Opening tabs
To open a new tab, select + or press Ctrl+T. This opens an empty tab in the Firefox window. To open a link on a web page or a bookmark in a tab, middle-click it. Alternatively, right-click a link and select . You may also open an address in the location bar in a new tab with a middle-click or by pressing Ctrl+Enter.
- Closing Tabs
Right-click on a tab to open a context menu, giving you access to tab managing options such as closing, reloading, or bookmarking. To close a tab, you may also use Ctrl+W or click the close button. Any closed tab can be restored by choosing from +. In order to reopen the last closed tab either choose from the context menu or press Ctrl+Shift+T.
- Sorting Tabs
By default, tabs are sorted in the order you opened them. Rearrange the tab order by dragging and dropping a tab to the desired position. If you have opened a large number of tabs, they will not all be displayed in the tab bar. Use the arrows at the ends of the bar to move left or right-click on the down arrow at the right end of the tab bar to get a list of all tabs.
- Dragging and Dropping
Drag and drop also works with tabs. Drag a link onto an existing tab to open it in that tab or drag and drop a link on an empty space in the tab bar to open a new tab. Drag and drop a tab to the desktop to open it in a new browser window.
There are two ways to find information in Firefox: use the search bar to search the Internet with a search engine or the find bar to search the page currently displayed.
Firefox has a search bar that can access different engines like Google,
Yahoo, or Amazon. For example, if you want to find information about
SUSE using the current engine, click in the search bar, type
SUSE, and hit Enter. The
results appear in your window. To choose your search engine, click the
icon to the left of the search bar. A menu opens with a list of
available search engines.
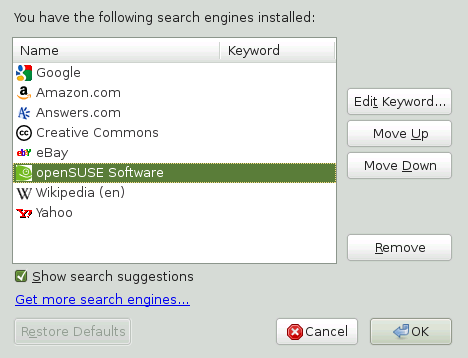
If you want to change the order, add, or delete a search engine, establish an Internet connection and proceed as follows.
Click the icon to the left of the search bar.
Select from the menu.
Click to delete an entry and to change the order.
To add a search engine, click . Firefox displays a Web page with available plug-ins. You can choose from Wikipedia, IMDB, Flickr, and numerous others. Click to install it.
Some Web sites offer search engines that you can add directly to the search bar. Whenever you enter such a Web site, the icon to the left of the search bar turns blue. Click on the icon and select the “Add” entry from the menu.
Firefox lets you define your own smart keywords:
abbreviations to use as a URL shortcut for a particular search engine.
If you define ws as a smart keyword for the
Wikipedia search for example, you can now type ws
into the location bar
to search Wikipedia for SEARCHTERMSEARCHTERM.
To assign a shortcut for a search engine from the search bar, click the icon to the left of the search bar and open the dialog. Mark a search engine and open the dialog.
It is also possible to define a smart keyword for any search field on a Web site. Proceed as follows:
Right-click on the search field and choose from the menu that opens. The dialog appears.
In , enter a descriptive name for this smart keyword.
Enter your for this search.
Choose the location where to save this smart keyword with .
Finalize with .
![[Tip]](admon/tip.png) | Smart Keywords for Regular Web sites |
|---|---|
Using smart keywords is not restricted to search engines. You can also
add a smart keyword to a bookmark (via the bookmark's properties). For
example, if you assign | |
To search inside a Web page, click + or press Ctrl+F. The find bar opens. It is usually displayed at the bottom of a window. Type your query in the input field. Firefox finds the first occurrence of this phrase as you type. You can find other occurrences of the phrase by pressing F3 or the button in the find bar. Clicking the button will highlight all occurrences of the phrase. Checking the option makes the query case-sensitive.
Firefox also offers two quick-find options. Click anywhere you like to start a search on a Web page, type the key / immediately followed by the search term. The first occurrence of the search term will be highlighted as you type. Use F3 to find the next occurrence. It is also possible to limit quick-find to links only. This search option is available by typing the key '.
Bookmarks offer a convenient way of saving links to your favorite Web sites. Firefox not only makes it very easy to add new bookmarks with just one mouse click, it also offers multiple ways to manage large bookmark collections. You can sort your bookmarks into folders, create filtered views (called smart bookmarks) that will be updated on the fly, or you can classify bookmarks with tags.
Add a bookmark by clicking on the star in the location bar. The star will turn yellow to indicate the page is bookmarked. Clicking once will save the bookmark in the folder under the page title. Double clicking on the star opens a menu which lets you choose a location where to save the bookmark and lets you enter a name and tags. Bookmarking tabs is done via the context menu. Right-click in a tab and choose whether to or to . In the latter case Firefox asks you to create a new folder for the tab links. To remove or edit a bookmark, open it and click on the star in the location bar.
The can be used to manage the properties (name and address location) for each bookmark and organize the bookmarks into folders and sections. It resembles Figure 14.3, “The Firefox Bookmark Library”.
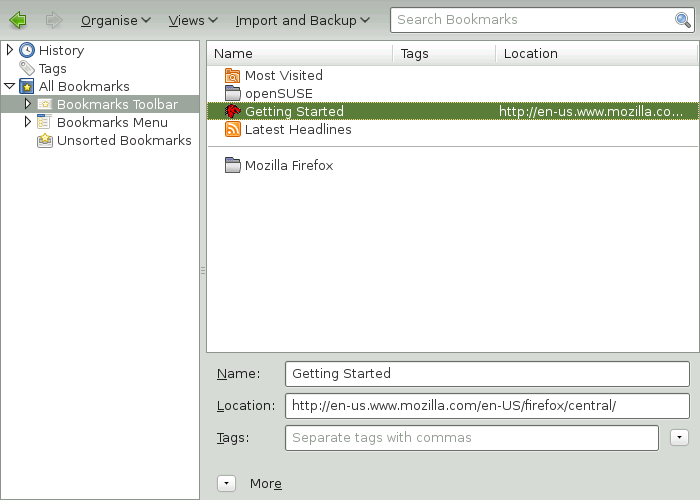
To open the , click +. The library window is split into two parts: the left pane shows the folder tree view, the right pane the subfolders and bookmarks of the selected folder. Use to customize the right pane. The left pane contains three main folders:
- History
Contains your complete browsing history. You cannot alter this list other than by deleting entries from it.
- Tags
Lists bookmarks for each tag you have specified. See Section 14.3.2, “Tags” for more information on tags.
- All Bookmarks
This category contains the three main bookmark folders:
- Bookmarks Toolbar
Contains the bookmarks and folders displayed beneath the location bar. See Section 14.3.6, “The Bookmarks Toolbar” for more information.
- Bookmarks Menu
Holds the bookmarks and folder accessible via the entry in the main menu or the bookmarks side menu.
- Unsorted Bookmarks
Contains all bookmarks created with a single click on the star in the location bar. This folder is only visible in the library and the bookmarks sidebar.
Organize your bookmarks using the right pane. Choose actions for folders or bookmarks either from the context menu that opens when you right-click on an item or from the dialog. The properties of a chosen folder or bookmark can be edited in the bottom part of the right pane. By default, only , , and are displayed for a bookmark. Click to gain access to all properties.
Use drag and drop to rearrange your bookmarks. Left-click a bookmark and drag it to a new position while holding the mouse button pressed. Drop it by releasing the mouse button. You can use this technique to move a bookmark or a folder to a different folder, or to change the order of bookmarks in a folder.
Tags offer a convenient way to file a bookmark under several categories.
You can tag a bookmark with as much terms as you want. For example, to
access all sites tagged with suse enter
suse into the location bar. Whats more, a smart
bookmark folder for each tag is automatically created in the tags folder
of the library. Drag and drop a smart bookmark for a tag onto your
bookmark toolbar or into a folder of your bookmarks menu to easily
access it.
To add tags to a bookmark, open the bookmark in Firefox and click on the yellow star in the location bar. The dialog opens where you can add a comma separated list of tags. It is also possible to add tags via the bookmark's properties dialog which you can open in the library or by right-clicking on a bookmark in the menu or the toolbar.
If you used a different browser in the past, you probably want to use your old bookmarks in Firefox, too. Firefox can automatically import bookmarks from other browsers installed on your system, such as Netscape or Opera. You also can import bookmarks from a file exported from a browser on different computer or from a backup.
To import bookmarks from another browser or from a file in HTML format,
open the library by choosing +. Start the Import
Wizard by choosing + and choose an import
location. Start the import by clicking .
Bookmarks from another browser are imported to a separate folder under
the bookmarks menu named From . Imports from an HTML file are imported as
is.
Browser
Name
Exporting bookmarks is also done via the dialog in the library window. To save your bookmarks as
an HTML file, choose . In order to
create or restore a backup of your bookmarks, choose
or . Firefox uses
the JavaScript Object Notation file format (.json)
for backups.
Live bookmarks display headlines in your bookmark menu and keep you up to date with the latest news. This enables you to save time with one glance at your favorite sites. Live bookmarks update automatically.
Many sites and blogs support this format. A Web site indicates this by showing an orange icon in the right part of the location bar. Click the icon and choose in the page that opens. A dialog box opens in which to select the name and location of your live bookmark. Confirm with . This page also lets you choose alternative applications to subscribe to, such as , or .
Smart bookmarks are virtual bookmark folders that are dynamically updated. By default, three smart bookmark folders are already predefined: the links are available from your bookmarks toolbar, links and are located in the bookmarks menu. You can create new smart bookmarks by searching for certain entries in your library.
To create a new smart bookmark, open the library by choosing + and proceed as follows:
Either select one of the main folders (, , ) or a specific bookmarks folder.
Enter a search term into the input field, for example
Linux. This will do a case insensitive search for all links containing the phraseLinuxin either the Web page title, the tags, or the URL.the search to create a new smart bookmark. A smart bookmark will always be saved to the bookmarks menu folder—drag and drop it to the desired location.
| |
Creating a smart bookmark from your saved bookmarks creates an up-to-date filtered view on your bookmarks that only changes when you add or delete bookmarks matching the search term.
A smart bookmark folder based on your browsing history dynamically
changes as you surf the Web. Every time you browse a site that matches
the search term, it gets “added” to your smart bookmark.
For this reason, it is recommended to use search terms that are as
specific as possible. If you are interested in links to
openSUSE-specific topics as
opposed to general Linux topics, use
| |
![[Warning]](admon/warning.png) | |
Clearing the private data also deletes the browsing history (unless configured otherwise) and so will also clear history based smart bookmarks! | |
The Bookmarks Toolbar is displayed beneath the
location bar and lets you quickly access bookmarks. You can also add,
organize, and edit bookmarks directly. By default, the
Bookmarks Toolbar is populated with a predefined set
of bookmarks organized into several folders (see
Figure 14.1, “The Browser Window of Firefox”).
To manage the Bookmarks Toolbar you can use the
library as described in
Section 14.3.1, “Organizing Bookmarks”. Its content is
located in the . It is also
possible to manage the toolbar directly. To add a folder, bookmark, or
separator, right-click on an empty space in the toolbar and choose the
appropriate entry from the pop-up menu. To add the current page to the
bar use drag and drop: left-click on the Web page's icon in the location
bar and drag it to the desired position on the bookmarks toolbar while
pressing the mouse button. Hovering over an existing bookmark folder
will automatically open it, enabling you to place the bookmark within
this folder.
To manage a certain folder or bookmark, right-click on it. A pop-up menu opens which lets you it or change its . To move or copy an entry, choose , or and it to the desired position.
Keep track of your current and past downloads with the help of the download manager. It automatically opens every time you download a file. To manually start the download manager, click +. While downloading a file, a progress bar indicates the download status. If necessary, pause the download and resume it later. To open a downloaded file with the associated application, click . To open the location to which the file was saved, choose . only deletes the entry from the download manager, it does not delete the file from the hard disk.
By default, all files are downloaded to your desktop. To change this behavior, open the download manger's configuration window from + and go to the tab. In the area, either choose another location or .
| Resuming Downloads |
|---|---|
If your browser crashes or is closed while downloading, all pending downloads will automatically be resumed in the background when starting Firefox the next time. A download that was paused before the browser was closed can manually be resumed via the download manager. | |
Since browsing the Internet has become more risky, Firefox offers various measures to make browsing safer. It automatically checks whether you are trying to access a site known to contain harmful software (malware) or a site known to steal sensitive data (phishing) and stops you from entering these sites. The Instant Web Site ID lets you easily check a site's legitimacy, and a password manager and the pop-up blocker offer additional security. With Private Browsing you can surf the Internet without Firefox recording any data on your computer.
Firefox allows you to check the identity of a Web page with a single glance. The color of the Web site's icon (also called favicon) in the location bar to the left of the address indicates which identity information is available and whether communication is encrypted or not:
- Gray
The site does not provide any identity information and communication between Web server and browser is not encrypted. This is fine as long as you do not exchange sensitive information with this site. Most web sites will be “gray”.
- Blue
This site is from a domain that has been verified by a certificate, so you can be sure that you are really connected to the very site it claims to be. Communication with a “blue” server is always encrypted.
- Green
This site completely identifies itself by a certificate that ensures a site is owned by the person or organization it claims to be. This is especially important when exchanging very sensitive data (for example when doing money transactions over the Internet). In this case you can be sure to be on your bank's Web site when it sends complete identity information. Communication with a “green” server is always encrypted.
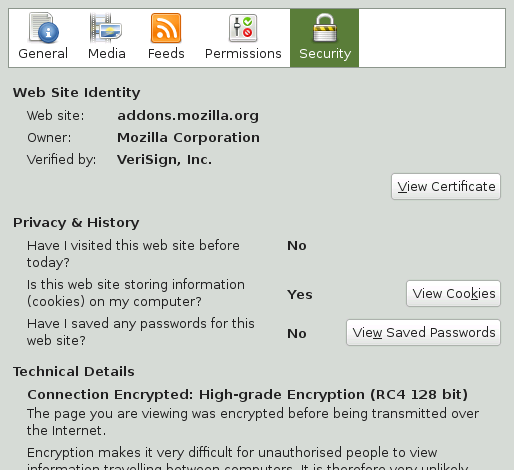
To view detailed identity information, click the Web site's icon in the location bar. In the opening pop-up click on to open the Page Info Window. Here, you can view the site's certificate and the encryption level, as well as information about stored passwords and cookies.
With the view you can set per-site permissions for image loading, pop-ups, cookies and installation permissions. The view lists all images, background graphics and embedded objects from a site and displays further information on each item together with a preview. It also lets you save each individual item.
Each time you enter a username and a password on a Web site, Firefox offers to store this data. A new toolbar on top of the page opens, asking you whether you want Firefox to remember the password. If you accept by clicking , the password will be stored on your hard disk in an encrypted format. The next time you access this site, Firefox will automatically fill in the login data.
To review or manage your passwords, open the password manager by clicking +++. The password manager opens with a list of sites and their corresponding usernames. By default, the passwords are not displayed. You can click on to display them. Delete single or all entries from the list using or , respectively.
To protect your passwords from unauthorized access, you can set a master password that is required when managing or adding passwords. Open the tab on the dialog and check .
By default, Firefox keeps track of your browsing history by storing content and links of visited websites, cookies, downloads, passwords, search terms and formula data. Collecting and storing this data makes browsing faster and more convenient. However, when you use a public terminal or a friend's computer, for example, you might want to turn it off. In Private Browsing mode Firefox will not keep track of your browsing history nor will it cache the content of pages you have visited.
Enable the Private Browsing mode by either clicking + or by pressing Ctrl+Shift+P. The current website and all open tabs
will be replaced by the Private Browsing information screen. As long as
you will browse in private mode, the string (Private
Browsing) will be displayed in the window's title bar.
Disable Private Browsing by either clicking + or by pressing Ctrl+Shift+P. Your previous session will be restored.
To make Private Browsing the default mode, open the tab in the Preference window as described in Section 14.6.1, “Preferences”, set to and then choose .
| Bookmarks and Downloads |
|---|---|
Downloads and bookmarks you made during Private Browsing mode will be kept. | |
Firefox can be customized extensively. You can not only change the way Firefox behaves (by altering its preferences), but also add additional functionality (by installing extensions) or change the look and feel (by installing new themes). With the Add-ons manager, Firefox offers a convenient way to manage extensions, themes and plugins.
Firefox offers a wide range of configuration options available via +, see Figure 14.5, “The Preferences Window”. Each option is described in detail in the online help, which can be accessed by clicking the button.
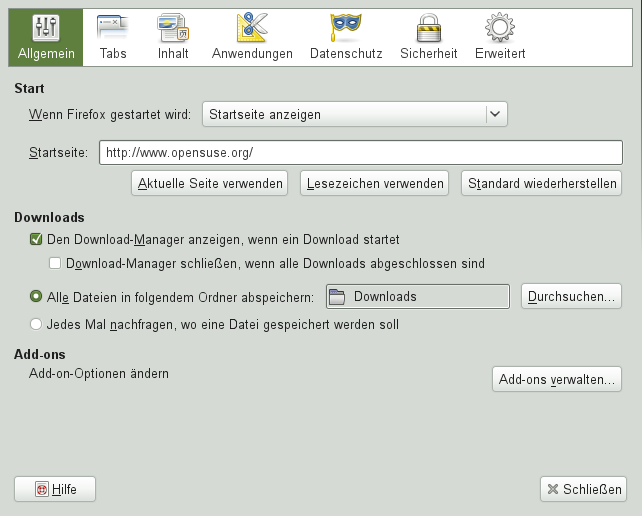
By default, Firefox automatically restores your session—windows and tabs— only after it has crashed, or after a restart when having installed an extension. However, it can be configured to restore a session every time it is started: Open the Preferences dialog as described in Section 14.6.1, “Preferences” and go to the tab. Set to .
When you have multiple windows open they will only be restored the next time when you close all of them at once with + or with Ctrl+Q. If you close the windows one by one, only the last window will be restored.
When sending a request to a Web server, the browser always sends the information about which language is preferred by the user. Web sites that are available in more than one language (and are configured to evaluate this language parameter) will display their pages in the language the browser requests. On openSUSE, the preferred language is preconfigured to use the same language as the desktop. To change this setting, open the window as described in Section 14.6.1, “Preferences”, go to the tab and your preferred language.
When typing into multiple-line input fields, Firefox, by default, spell-checks what you type. Misspelled words are underlined in red. To correct a word, right-click it and choose the correct spelling from the context menu. You may also add the word to the dictionary, if it is correct.
To change or add a dictionary, right-click anywhere in a multi-line input field and choose the appropriate option from the context menu. Here you may also disable spell-checking for this input field. If you want to globally disable spell checking, open the window as described in Section 14.6.1, “Preferences” and go to the tab. Uncheck .
Extensions let you personalize Firefox to exactly fit your needs. With the help of extensions you can change Firefox's look and feel, enhance existing functionality (such as the download manager or tabbed browsing), and add functions (such as a blog editor, Bit Torrent support or even a music player). Certain extensions also assist Web developers, while others increase security by dynamically blocking active content. More than 5000 extensions are available for Firefox. With the add-ons manager you cannot only install new extensions, but also disable, enable, or delete them. It also finds updates for installed extensions.
If you do not like the standard look and feel of Firefox, install a new theme. Themes do not change the functionality, only the appearance of the browser.
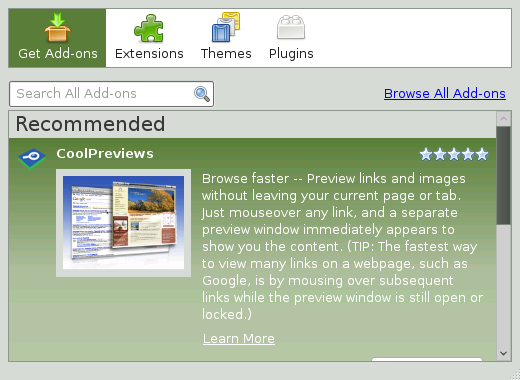
To add an extension or theme, start the add-ons manager with +. It opens with the tab either displaying a choice of recommended add-ons or the results of your last search. Use the field to search for specific add-ons. Click on an entry in the list to view a short description and a screenshot. Install the add-on by clicking or open a Web page with detailed information by clicking the link.
If you just want to browse all available add-ons or would like to use advanced search options, click . This opens the Firefox add-ons Web page. To install an extension, click on the button on the page describing the add-on.
In order to activate freshly installed extensions or themes, Firefox needs to be restarted via the button in the add-ons manager. Restarting the browser with this button ensures that the complete session will be restored.
The Add-ons Manager also offers a convenient interface to manage extensions, themes, and plugins. can be enabled, disabled or uninstalled. If an extension is configurable, its configuration options can be accessed via the button. In the tab you may a theme, or activate a different theme by clicking on . Pending extension and theme installations are also listed. Select to stop the installation. Although you cannot install as a user, you may disable or enable them with the Add-ons manager.
Actions like uninstalling or disabling an add-on require a browser restart. Each time you perform such an action, the button is displayed in the add-ons manager.
Before you actually print a Web page, you can use the print preview function to control how the printed page will look like. Choose +. Configure paper size and orientation per printer with +.
To print a Web page either choose + or press Ctrl+P. The Printer dialog opens. To print with the default options just click .
The Printer dialog also offers extensive configuration options to fine-tune the printout. On the tab, choose a printer, the range to print, the number of copies and the order. lets you specify the number of pages per side, the scaling factor as well as paper source and type. You can also activate double-sided printing here if the printer supports it. Control how frames, backgrounds, header and footer are printed on the tab. You may also specify options, such as printing at a specific time, and the in this dialog.
Get more information about Firefox from the official knowledge base available via F1. More useful information is available from the following links:
| Support forum: http://support.mozilla.com/forum |
| Main Menu reference: http://support.mozilla.com/kb/Menu+reference |
| Preferences reference: http://support.mozilla.com/kb/Options+window |
| Keyboard shortcuts: http://support.mozilla.com/kb/Keyboard+shortcuts |